DIY Car Window Tinting at Home A Pro-Level Guide
Thinking about car window tinting at home? Our guide covers tools, techniques, and common mistakes to help you achieve a flawless, professional-level finish.
Dec 17, 2025
generated
car window tinting at home, DIY window tint, how to tint car windows, automotive DIY, car care

Thinking about tinting your own car windows? It's one of those DIY projects that's incredibly satisfying when you get it right, and it can definitely save you some serious cash. But I'll be straight with you: this job is all about patience and precision. For anyone willing to take their time, especially on cars with flatter windows, it's absolutely doable. The secret is in the prep work.
Should You Tint Your Car Windows at Home
The appeal of a DIY tint job is easy to understand. First and foremost, you'll save money—professional jobs can easily cost several hundred dollars. Plus, there's a real sense of pride that comes from customizing your own ride. Before you get too excited and start unrolling that film, though, it’s important to know what you’re getting into.
Whether or not you should tackle car window tinting at home really comes down to you, your workspace, and the car you drive.
Assessing Your Skills and Situation
First, a little self-reflection. Are you a patient person? Can you be meticulous? Window tint film is not forgiving. A single speck of dust or a tiny crease can ruin a whole panel, sending you right back to square one. If you’re the type who enjoys a slow, methodical process, you’re in a great spot.
Next up is your workspace. This is non-negotiable: you need a clean, still, indoor space, like a closed garage. Trying to do this outside is a recipe for disaster. Dust, wind, and pollen will become your worst enemies, getting trapped under the film and creating a bubbly mess.
Finally, take a good, hard look at your car's windows.
Beginner-Friendly Cars: If you're driving a sedan, coupe, or truck with mostly flat side windows, you've got the perfect canvas to learn on. These simple shapes are much easier to work with and don't require a lot of advanced techniques.
Challenging Vehicles: On the other hand, SUVs, vans, and sports cars often have glass with complex curves, especially those big rear windshields. Getting the film to lay flat on these shapes requires skill with a heat gun to shrink the material just right.
A classic rookie mistake is underestimating a curved back window. It might not look that dramatic, but trying to apply a flat sheet of film to it can quickly turn into a nightmare of creases and wasted material. The end result can look far worse than having no tint at all.
An honest assessment is your best first step. If you have a car with simple windows and the patience to follow directions to the letter, you can absolutely nail a DIY tint job. But if you’re dealing with a brand-new luxury car or one with tricky curves, it might be a smarter move to call in a mobile professional.
Choosing the Right Film and Tools for the Job

Let's be honest: a pro-level tint job is impossible without the right gear. Your success hinges on what you have in your hands before you even touch the car. So, let’s get your toolkit sorted and break down the different kinds of tint film you'll find out there.
Think of your basic installation kit as a specialized cleaning and application arsenal. The absolute must-haves are a good spray bottle for your slip solution, a razor blade scraper for getting the glass surgically clean, and a stack of lint-free microfiber towels. For the actual install, you’ll need a fresh, sharp utility knife and a few different squeegees.
A flexible, soft squeegee is your friend for navigating curved glass, while a hard, rigid one is what you'll use to force every last drop of water out.
H3: Essential Tools for the Task
Beyond the basics, a few pieces of equipment truly separate a frustrating afternoon from a fantastic result. A heat gun is at the top of that list. You might be tempted to grab a hairdryer, but it just doesn't deliver the consistent, focused heat required to properly shrink the film to fit those tricky curved windows.
Heat Gun: This is non-negotiable, especially for shrinking the film to fit a curved rear windshield.
Hard Card Squeegee: The workhorse for pushing water out from under the film.
Conquerer or Bulldozer Squeegee: These specialty tools are lifesavers for reaching into tight corners and tucking the film behind window gaskets.
Light Source: Don't underestimate this one. Good lighting is the only way to spot the tiny dust specks and bubbles that are invisible otherwise.
H3: Selecting the Best Tint Film
Picking the right film is just as critical as having the right tools. When you're tackling this at home, you'll generally come across a few main types. Each one has its own set of quirks, especially for a DIYer.
Choosing the right film can feel overwhelming, but understanding the core differences will point you in the right direction for your skill level and budget.
Film Type | Key Benefit | DIY Difficulty | Average Cost |
|---|---|---|---|
Dyed Film | Most affordable and easiest to shrink | Beginner | $ |
Carbon Film | Excellent UV/heat rejection, won't fade | Intermediate | $$ |
Ceramic Film | Superior heat rejection, no signal interference | Advanced | $$$ |
While dyed film is tempting for its low cost, it's worth considering the long-term benefits of carbon or ceramic. Let's dig a little deeper.
Dyed film is the most budget-friendly option and is pretty forgiving for beginners since it shrinks easily. The downside? It offers the least heat rejection and, over time, can fade and turn that dreaded shade of purple.
Carbon film is a solid middle ground. It provides much better heat and UV protection than dyed film and, crucially, it won’t fade. It also has that deep, matte black look that a lot of people are after.
Ceramic film is the premium choice. It delivers the best heat rejection available without having to be super dark, and it won't mess with your phone or GPS signals. It's often a bit thicker, which can make it more challenging to install but also more durable in the long run. If you want a closer look at professional-grade materials, we break it down further in our guide on window tint options.
My advice? Spend a little more on a quality carbon or ceramic film. Cheap films are often thinner, crease more easily, and have weaker adhesives. All that adds up to a much higher chance of frustration and mistakes during the install.
The good news is that the demand for better tint has made great materials more accessible than ever. The global automotive tinting film market hit about $7.59 billion in 2024, which has pushed manufacturers to create high-quality DIY kits for people just like you. With North America being a huge part of this market, you can now get your hands on advanced ceramic films that were once exclusive to professional shops.
Getting Your Windows Ready for a Flawless Finish
If there's one secret to getting that professional, straight-from-the-shop look when tinting your car windows at home, it’s this: preparation is everything. The actual part where you apply the film is crucial, sure, but even the steadiest hands can't make up for a dirty window. Every single speck of dust, oily fingerprint, or bit of invisible grime left on the glass will turn into a permanent, ugly bubble under your new tint.
Think of this stage as creating a surgically clean canvas for your work. You're not just wiping the glass down; you're deep cleaning it on a microscopic level. Honestly, this is the single best thing you can do to avoid the frustrating little imperfections that ruin most DIY tint jobs.
Deep Cleaning for a Perfect Bond
First things first, give both the inside and outside of the window a good initial wash with your soap and water solution. A lot of beginners skip cleaning the outside, but trust me, it's essential. You need a clean outer surface to get an accurate template when you start cutting the film.
Now for the most critical part of the cleaning process: the razor blade. Get your slip solution and generously spray the inside of the window. Holding a fresh, sharp razor blade at about a 45-degree angle, carefully scrape the entire surface. You will be absolutely amazed at the invisible gunk that comes off a window you thought was perfectly clean. This step gets rid of stubborn old adhesives, oils, and all the environmental buildup that a simple wipe-down just can't handle. Just be extra careful around the edges so you don't nick any of the trim.
After you've scraped the glass, it's time to flush all that debris away.
Spray Generously: Drench the window again with your slip solution, always working from the top down.
Squeegee It Clean: Use firm, overlapping strokes with your squeegee. Pull all the solution and the gunk you just loosened straight down and off the glass.
Wipe the Gaskets: Grab a lint-free microfiber cloth and carefully wipe down the rubber gaskets and seals around the window frame. These are notorious hiding spots for dust that will find its way onto your film.
Your slip solution is the lifeblood of the entire installation. The perfect mix is usually just a few drops of baby shampoo per pint of water. It provides just the right amount of lubrication. Too much soap will leave a hazy film, but too little will make the tint stick instantly, giving you zero chance to make adjustments.
Final Inspection and Prep
Before you even dream of bringing the tint film anywhere near the car, do one last check. Roll the window down an inch or two and meticulously clean the very top edge of the glass—the part that was just hiding inside the door seal. This spot is a major dust trap and the number one reason for peeling edges down the road.
While the window is down, it's a good idea to make sure it's working smoothly. If you notice it's slow, jerky, or getting stuck, it's smart to fix that first. You can find some great advice in our guide to power window repair.
Once the glass is absolutely spotless, give the area one last light spray and a final, careful squeegee. From this moment on, that surface is a strict no-touch zone. The goal is to go from this perfectly pristine state directly to applying the film without letting a single new contaminant get in the way.
Installing the Tint Film: The Final Stretch
Alright, this is where the magic happens. All that cleaning and preparation comes down to this moment—actually getting the film on the glass. It’s all about a steady hand and a bit of patience.
We'll walk through making your template, cutting the film precisely, and then tackling the most critical skill for a pro-level finish: wet-shrinking. This is what separates a DIY job from a professional one, as it lets you perfectly mold a flat sheet of film to the curves of your car's windows.
Creating and Cutting Your Film Template
First things first, you’ll work on the outside of the window to create your pattern.
Give the exterior glass a good spray with your soap and water solution. This lets the tint film stick just enough without the adhesive. Roll out a piece of film that's bigger than the window and lay it on the wet glass. Make sure the clear, removable liner is facing you.
Now, it's time to trim. Use your knife to carefully cut around the film, leaving about a one-inch border. For the bottom edge, a neat little trick is to roll the window down about an inch and then slice a perfectly straight line along the top of the glass. This gives you a factory-clean edge that you'll tuck into the window seal later.
Once you have your rough shape, gently lift the film off and place it on your clean, flat work surface for the final, precise trim. Take your time here; clean cuts are everything.
Mastering the Wet-Shrinking Technique
This is easily the trickiest part of the job, but it’s essential for any window that isn't perfectly flat (which is most of them). Heat-shrinking is how you get the film to conform to the glass's curves, especially on rear windshields.
Place your oversized, cut-out piece of film back on the wet exterior glass, liner-side out. Squeegee a single horizontal line across the middle to hold it in place. You’ll immediately see "fingers"—pockets of moisture where the film is lifting away from the curved glass. Your job is to eliminate them.
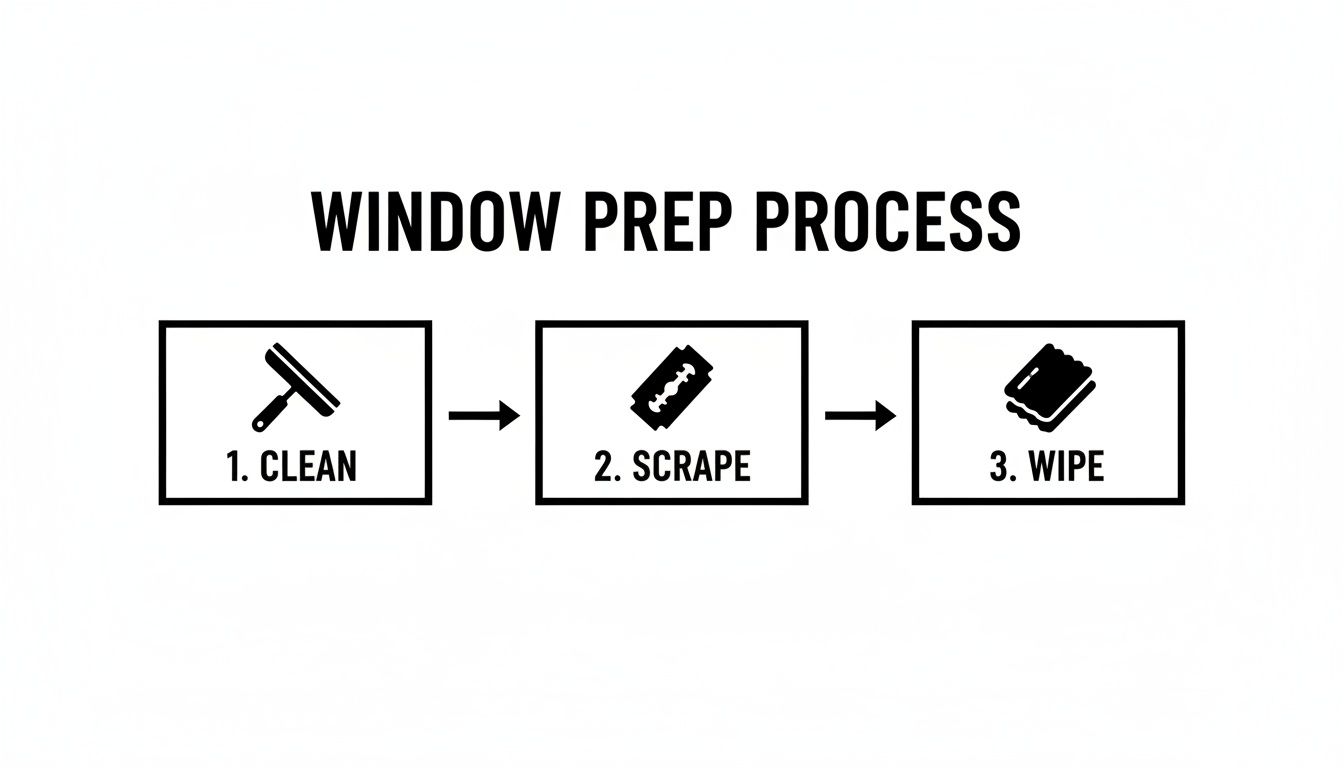
Remember, none of this works without a perfectly clean surface. Following the clean, scrape, and wipe process shown here ensures no tiny spec of debris ruins your application.
Grab your heat gun and set it to a medium temperature. Gently warm one of the fingers until you see the film visibly shrink and wrinkle. Don't linger! Immediately use your hard card squeegee to smooth that shrunken area down. Move methodically from finger to finger until the entire film lies perfectly flat against the glass.
A common rookie mistake is toasting the film. You'll burn a hole right through it. Keep the heat gun moving constantly and maintain a distance of about 6-8 inches from the glass. You want to warm it, not cook it.
Applying the Film to the Window
With your film perfectly shrunk and custom-fit, you're ready for the main event.
Give the inside of the window one final, thorough cleaning. Now, carefully start peeling the clear liner away from the film. As you peel, spray the newly exposed adhesive with your slip solution. At the same time, give the inside of the window a final, liberal spray as well.
Hands Off: Only handle the film by its very edges. Fingerprints on the adhesive are permanent.
Float and Slide: Gently bring the wet film to the wet interior glass. The slip solution creates a slick surface, giving you a few moments to slide the film around.
Positioning is Key: Align the top of the film with the top edge of the glass, leaving a tiny 1/16-inch gap.
Once it's perfectly positioned, you need to lock it in. Use your squeegee to make a single, firm horizontal stroke across the middle of the film. This "tacks" it in place and stops it from moving.
From that center line, begin squeegeeing the water and air out toward the edges. Use firm, overlapping strokes. The goal is to push out every last drop of solution, ensuring the adhesive makes full contact for a flawless, bubble-free bond.
Even with the best prep in the world, a few common slip-ups can derail your tint job. Knowing what to watch for ahead of time is the best way to keep a small mistake from turning into a major headache. Let's walk through the most common issues people run into when they're car window tinting at home.
One of the worst things that can happen is getting a permanent crease in the film. This almost always happens before the tint even touches the glass, usually from fumbling with the material or letting it fold over and stick to itself. Handle the film gently, and you'll be fine. If you do get a crease, a little heat from a heat gun can sometimes relax it, but honestly, it's much easier to prevent it in the first place.
Then there’s the dreaded spec of dust. You can clean like a surgeon, but one little piece of lint can float in at the last moment and get trapped. If you see one right after laying the film but before you've started squeegeeing, you might get lucky. Carefully lift a corner, spray more slip solution underneath to flush it out, and lay it back down.
Tackling Bubbles and Peeling Edges
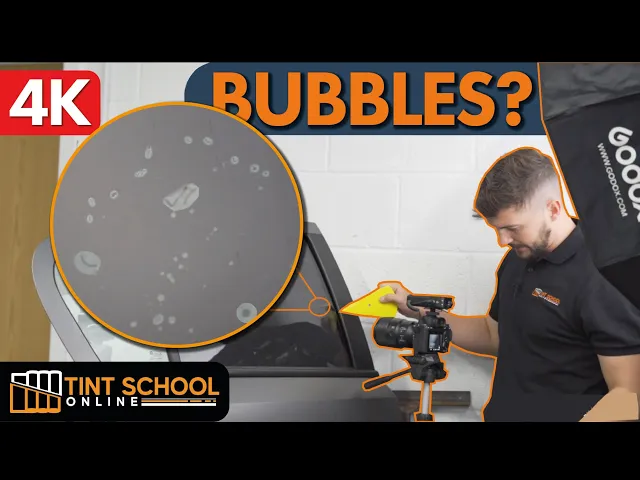
Don't panic if you see small bubbles; it's practically a guarantee on your first try. Little water bubbles, sometimes called "blisters," are totally normal. They'll disappear on their own over a few weeks as the moisture cures and evaporates right through the film. The key is to leave them alone—trying to push them out after the fact will just stretch the tint.
Air bubbles, on the other hand, are a different animal. If you trap a pocket of air, try to gently work it to the closest edge with your hard card squeegee. If it's stubborn, you can prick it with the very tip of a sharp blade to release the air, then smooth it down.
I see this all the time: people are too shy with the slip solution. If you don't use enough, the film’s adhesive will grab the glass instantly, and you'll have no chance to position it correctly. Drench everything—the glass and the sticky side of the film. You literally can't use too much.
Peeling edges are another common frustration. This usually comes down to two culprits:
Contamination: Either the very edge of the glass wasn't perfectly clean, or your fingers touched the adhesive side.
Bad Squeegee Work: You didn't push all the water out from under the edges, so the film never got a solid bond.
Make sure every squeegee stroke goes firmly off the edge of the film. Once you're done, go back and use a hard card wrapped in a microfiber towel to really press down and "set" the edges, making sure every last bit is stuck tight.
Why Your Cuts Aren't Coming Out Clean
Nothing screams "DIY job" faster than jagged, sloppy cuts around the border of the window. The reason is almost always a dull blade. Tint film is surprisingly tough on blades and will dull a fresh razor in no time, sometimes after just one window.
Here’s the pro tip: snap off a new segment of your utility blade for every single window. It seems wasteful, but it's the secret to getting that crisp, perfect cut that lays down cleanly against the seals. A sharp blade is non-negotiable for a job you can be proud of.
When It's Smarter to Call a Pro
There's a huge sense of accomplishment in a great DIY project, I get it. But with car window tinting, there are definitely times when stepping back and calling in a professional is the smartest move you can make. This isn't about giving up; it’s about protecting your car and getting a result you’ll be happy with for years.
It’s one thing to practice on an old commuter car with flat windows. It's a completely different ballgame when you’re dealing with a vehicle where a simple mistake can lead to a massive repair bill. Let's break down when you should put the squeegee down and pick up the phone.
High-End Cars with Complex Electronics
If you drive a modern luxury car—think Mercedes, BMW, Audi, or Tesla—the door panels are packed with way more than just window regulators. They’re crammed with sensitive electronics, sensors, and control modules.
When you do a "wet application," it's easy for water and soap solution to run down and seep into those delicate components. Professional installers have seen it all and use specialized tools and water-blocking techniques to protect this stuff. They know exactly how to work around the complex wiring inside a new S-Class or a Model 3 without frying a critical system.
A little too much runoff can easily short out a window control module. Suddenly, that $100 you saved on a DIY tint kit turns into a $2,000 repair bill. At that point, the professional's fee looks like an absolute bargain.
Vehicles with ADAS Safety Systems
Here's a big one: Advanced Driver-Assistance Systems (ADAS). If your car has features like lane-keeping assist, adaptive cruise control, or automatic braking, you need to be extremely careful.
The cameras and sensors that run these systems are often mounted directly to the windshield or very close to other windows. Applying tint film anywhere near them can block their view or interfere with their signals. Even just popping off a piece of trim could throw a sensor out of alignment, potentially disabling a key safety feature when you need it most.
A professional knows how to work around this sensitive tech. More importantly, they understand that any work on the glass might require a system reset. For these features to work correctly, you often need proper ADAS calibrations after any glass work. Don't risk your safety to save a few bucks.
Glass with Extreme Curves
Finally, let's talk about geometry. Some cars have windows that are true works of art, like the deep, compound curve on the back glass of a Corvette or a Porsche Panamera.
Trying to make a flat sheet of tint film lay perfectly on a surface like that is less like a simple installation and more like high-level sculpting with a heat gun. It takes a ton of practice and a real feel for the material to shrink the film just right without creating ugly creases or fingers.
For these kinds of windows, the odds of a DIYer wasting expensive film and ending up with a bubbly mess are incredibly high. A seasoned pro has tackled hundreds of these challenging windows and has the muscle memory to get it right the first time.
When the job demands a level of precision that goes beyond a weekend project, Auto Renu Auto Glass LLC is here to help. Our mobile tinting service brings that expert touch right to your driveway, delivering a flawless finish on any vehicle, no matter how complex. Visit us at https://www.autorenu911.com to get a quote.