A Complete Guide to Replacing a Car Window
Learn how to handle the process of replacing a car window. Our guide covers DIY steps, costs, insurance, and when to call a mobile pro for a flawless fix.
Jan 19, 2026
generated
replacing a car window, auto glass replacement, car window repair, mobile auto glass, DIY car repair

That sinking feeling when you walk up to your car and see a shattered window is a universal one. It's more than just a hassle—it instantly compromises your car's security and exposes the interior to the elements. The first order of business is always safety: carefully cleaning up the glass and getting a temporary cover on there to buy yourself some time.
Your Car Window Is Broken—What Happens Next?
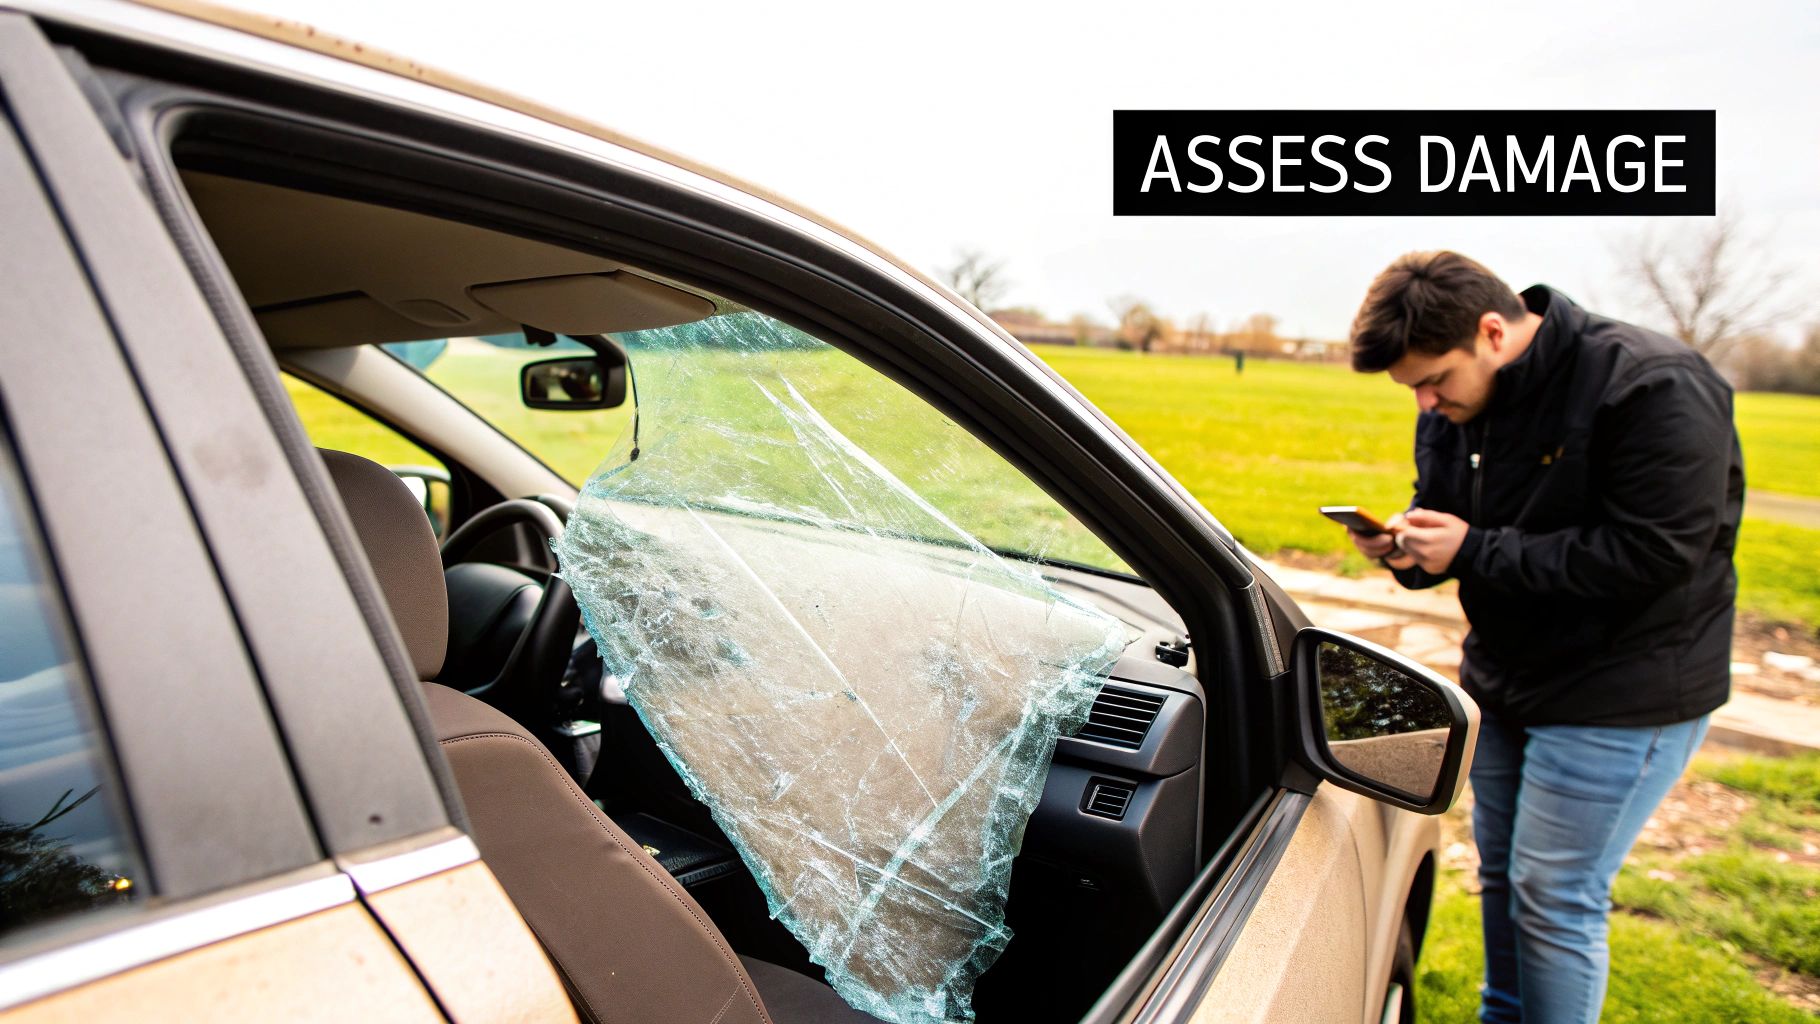
Finding a broken car window is beyond frustrating. It doesn't matter if it was a rogue rock on the highway, a break-in, or a minor accident—your next few moves are critical for preventing more damage and keeping yourself safe. Before you do anything else, you need to know what kind of glass you're working with.
Most side and rear windows are tempered glass. By design, this glass crumbles into thousands of small, granular chunks when it breaks. It’s a safety feature to prevent large, dangerous shards. Your windshield, on the other hand, is laminated glass, which cracks in a spiderweb pattern but stays in one piece. Knowing the difference helps you clean up safely.
Securing Your Vehicle Temporarily
After carefully cleaning up the glass, you need to seal that opening. This isn't just to keep the rain out; it’s a crucial security measure. A quick and effective temporary patch can be made with heavy-duty plastic sheeting (or a sturdy trash bag in a pinch) and strong packing or duct tape.
When you're putting on the cover, a few tips from the field can make a big difference:
Cut the plastic so it’s much larger than the window opening. You want a good overlap.
Tape it down on the outside of the car, securing it to the metal frame all the way around.
Pull the plastic tight as you tape it down. This stops it from flapping and making a racket when you drive.
This temporary fix is non-negotiable. It protects your interior from water damage—which can lead to nasty mold and expensive electrical issues—and makes your car a less tempting target for thieves. It’s a great stopgap, but it’s definitely not a long-term solution.
Planning Your Permanent Replacement
With your car patched up for the moment, you can start thinking about a permanent fix. This is where you have a major decision to make: try to replace it yourself or call in a professional mobile service? Your answer really depends on the window type, your own comfort level with tools, and your car's features.
Modern vehicles are more complex than they used to be. A simple power window replacement can involve wrestling with delicate electrical connectors inside the door panel. Even more, some newer cars have sensors for driver-assist systems located near the side glass. A botched installation could mess with these important safety systems. Figuring out these details is the first step toward getting your car back to 100%.
For situations that just can't wait, it's worth looking into your options for same-day glass repair to get you back on the road securely and without delay.
DIY or Professional Service: Making the Right Choice
Once you've secured your vehicle, the next big decision is how to tackle the permanent fix. Should you roll up your sleeves and replace the car window yourself, or is it time to call in a professional? There's no single right answer—it really comes down to your car's age, your comfort level with mechanical work, and which window is broken.
For some folks, especially those with an older car, replacing a simple, non-powered side window can feel like a totally manageable weekend project. It’s a great way to save some cash if you have the right tools and a bit of patience. These jobs are usually pretty straightforward.
But the game changes dramatically with modern vehicles. What looks like a simple pane of glass can be a complex piece of technology.
When To Seriously Consider Professional Help
Today's cars are loaded with electronics, and a surprising amount of it is tied directly to the windows. A DIY attempt on a newer vehicle without the right know-how can quickly snowball into a much bigger and more expensive problem.
You should definitely lean toward calling a pro if you're dealing with any of these situations:
Complex Electronics: Power windows, heated rear windows, and windows with built-in antennas all have delicate wiring. One wrong move, and you could fry the door’s entire electrical system.
Advanced Driver-Assistance Systems (ADAS): Many new cars have cameras and sensors mounted near the glass for safety features like lane-keeping assist. After a replacement, these systems absolutely must be recalibrated by a trained technician to work correctly.
Bonded Glass: Unlike side windows held in by clips and bolts, windshields and rear windows are bonded to the car’s frame with a high-strength adhesive. Getting that seal perfect is non-negotiable for your car's structural integrity and your safety.
The increasing complexity of auto glass is a big reason why the vehicle glass repair and replacement market is booming. Valued at USD 4.7 billion in 2024, it’s projected to reach USD 7.9 billion by 2032, fueled by the sheer number of new vehicles and millions of insurance claims each year. You can learn more about the vehicle glass market trends from HTF Market Insights.
The Value of a Mobile Glass Service
Choosing a professional doesn't mean you're stuck waiting at a repair shop all day. Mobile services like Auto Renu Auto Glass LLC bring the expertise and equipment right to your driveway or office parking lot. The convenience is fantastic, but the real benefit is the guaranteed quality and safety of the installation.
For jobs like this, using professional auto repair services ensures a top-notch fix. Certified technicians have the specialized tools to pop off a door panel without snapping all the delicate plastic clips. They have the experience to align the new window perfectly, so you won't have to deal with annoying rattles, leaks, or operational glitches later on.
Best of all, they stand behind their work with a warranty on both the glass and the labor. That’s peace of mind you just can't get from a DIY job.
To help you decide, let's look at a side-by-side comparison.
DIY vs. Professional Car Window Replacement
Factor | DIY Replacement | Professional Mobile Service (Auto Renu) |
|---|---|---|
Cost | Lower upfront cost for parts. | Higher upfront cost, but includes labor and expertise. |
Time | Can take several hours to a full day for a first-timer. | Typically completed in 60-90 minutes by an expert. |
Tools | Requires purchasing specific tools you may not own. | Technicians arrive with all necessary professional-grade tools. |
Warranty | No warranty on your labor; potential to void other car warranties. | Includes a warranty on both the glass and the installation workmanship. |
Quality | Risk of improper seals, leaks, rattles, or damaged panels. | Guaranteed proper fit, seal, and function, ensuring safety and quality. |
Safety Risk | High risk of incorrect ADAS calibration; improper seals can affect vehicle integrity. | ADAS recalibration performed correctly; ensures structural safety standards are met. |
At the end of the day, while saving a few bucks with a DIY project is always tempting, car window replacement is one of those areas where the risks can easily outweigh the rewards—especially on newer cars. A professional installation is your best bet for a safe, high-quality, and lasting solution.
A Step-By-Step Guide to Replacing a Side Window
So, you've decided to roll up your sleeves and replace a broken side window yourself. Good on you. This is a totally doable project for a motivated DIYer, especially for a standard, non-powered window. With the right tools and a patient approach, you can save a good chunk of change.
But before you dive in, let's talk about setup. A smooth replacement is all about having your ducks in a row. Scrambling to find the right socket or prying tool mid-job is how you turn a one-hour project into a frustrating three-hour ordeal.
Gathering Your Tools and Materials
This is one of those jobs where having the exact right equipment is non-negotiable. Trying to make do with a screwdriver instead of a proper trim tool will almost certainly lead to scratched paint, broken plastic clips, and a window that never quite seals right. Think of it like a surgeon laying out their instruments—everything has a purpose.
Here’s what you absolutely need to have on hand:
Safety Gear: Don't even start without safety glasses and heavy-duty gloves. Tempered glass shatters into thousands of tiny, razor-sharp pieces that can fly everywhere.
Trim Removal Kit: These plastic pry tools are your best friend. They’re designed to pop off door panels without marring the plastic or breaking the fragile clips.
Socket and Wrench Set: You'll need this to unbolt the window regulator and other parts inside the door. A 10mm socket is almost always required for this job.
Shop Vacuum: Your standard household vacuum won't cut it. A powerful shop vac with a crevice tool is essential for getting every last shard of glass out of the door's nooks and crannies.
Duct Tape or Painter's Tape: Perfect for temporarily securing the new glass in place while you get everything perfectly aligned.
And, of course, the new glass. Double-check that you have the right piece for your car's make, model, year, and the specific door (e.g., front driver's side vs. rear passenger's side).
Removing the Interior Door Panel
For most first-timers, this is the most nerve-wracking part. But it's not as bad as it looks if you move slowly and deliberately. Door panels are usually held on with a mix of hidden screws and plastic clips.
First, hunt for screws. Check inside the armrest pull cup, behind the interior door handle trim piece, and sometimes along the very bottom edge of the panel. Once they're all out, you can start gently prying the panel away from the door frame with your plastic trim tools. You’ll hear a series of pops as the clips release—that's a good sign!
With the clips free, lift the entire panel straight up to unhook it from the top of the door frame by the window. Go easy here—you'll have wires for the power locks and speakers and a mechanical rod or cable for the door latch. Carefully disconnect these before you set the panel safely aside.
This flowchart gives a great high-level view of when to DIY and when to call a pro.
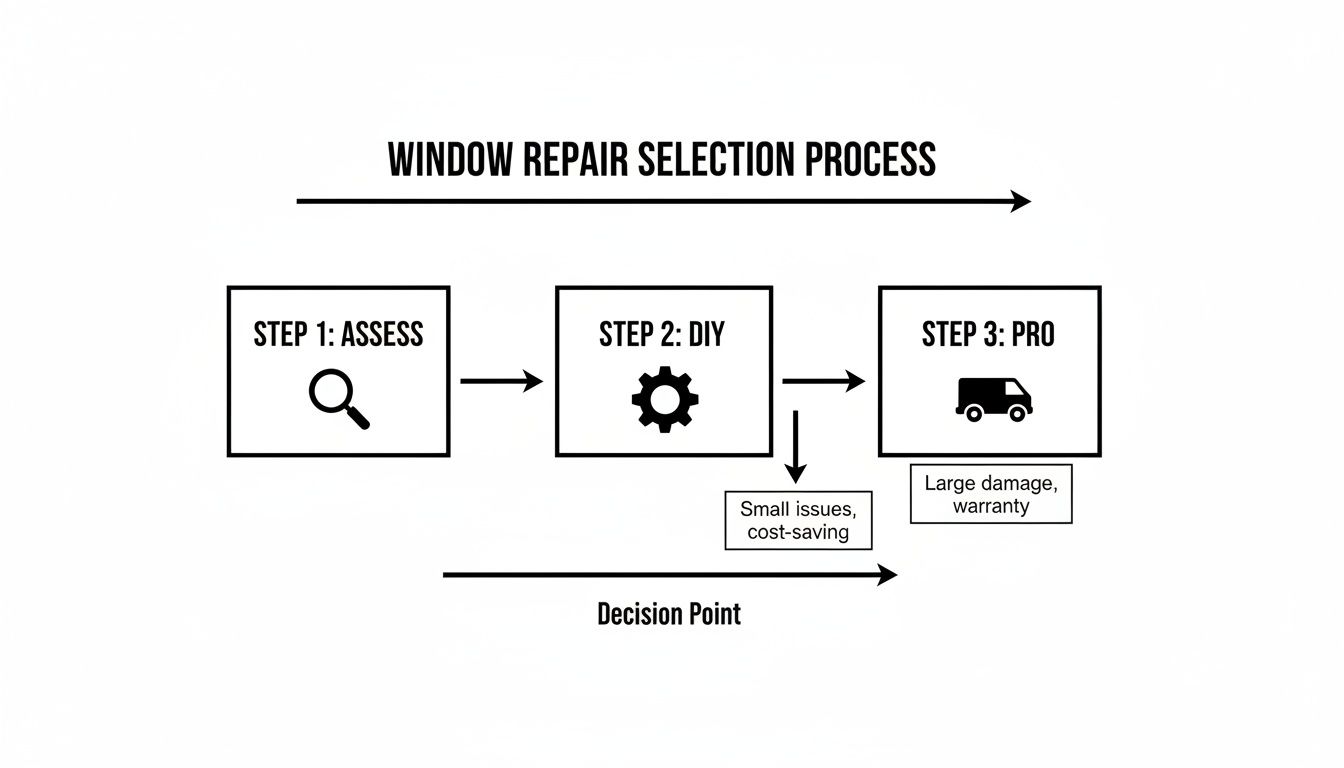
It really just boils down to assessing the damage. Small stuff can be a home project, but anything complex is best left to the experts.
The Cleanup and Installation Process
Once the panel is off, you'll see a plastic sheet or foam liner—the weather barrier. Carefully peel this back just enough to get inside the door. Now comes the most important part of the whole job: getting all that broken glass out.
Grab your shop vac and meticulously clean out the bottom of the door cavity. I can't stress this enough. Any little shard you miss will eventually start rattling around or, worse, get caught in the new window's regulator mechanism. Be thorough.
Now, find the window regulator. It’s the metal track that guides the window. You’ll see two clamps or mounting points where the bottom of the glass sits. If there are still bits of the old window bolted in there, unfasten them and clean them out completely.
It's time for the new glass. Carefully slide it down into the door through the opening at the top. Guide the bottom edge of the glass so it rests inside the regulator clamps.
Pro Tip: Don't tighten the bolts on the regulator clamps all the way just yet. Leave them snug but with a little play. This lets you make tiny adjustments to get the window perfectly aligned with the weatherstripping for a tight seal.
Gently raise the window to the top. If the fit looks good and it's sealing evenly all around, go ahead and tighten those regulator bolts down.
Reassembly and Final Checks
You're in the home stretch. Reassembly is just doing everything in reverse.
Start by re-sealing the weather barrier. A good seal prevents moisture and road noise from getting into your car. Then, reconnect all the electrical plugs and the door handle linkage before hooking the top edge of the door panel back over the door frame.
Align the panel clips with the holes and give the panel a firm smack with the palm of your hand around the edges to pop them back in. Reinstall the screws, and you're almost there.
Give the window a test run. If it's a manual crank, make sure it moves up and down smoothly without any catching or binding. While this guide covers a basic side window, the process for a rear window has its own set of challenges. For more details, check out our guide on how to replace a rear car window.
Finally, clean off any fingerprints, and you’re done! Tackling a job like this isn't just about fixing your car—it’s about the satisfaction of doing it right yourself.
Understanding Costs, Insurance, and Warranty
Let's talk money. Trying to figure out the financial side of a car window replacement can feel like you're navigating a maze. The final bill isn't just for a piece of glass—it's a mix of the glass itself, your car's specific features, and the hands-on labor to get it done right. Getting a handle on these pieces is the first step to making a smart decision.
Your most straightforward and affordable job is a basic tempered side window on an older, no-frills sedan. But the costs can climb surprisingly fast once you add in special features. For instance, many luxury cars use laminated glass for better sound dampening, and that's a more expensive material than standard tempered glass.
Factors That Influence Replacement Costs
Several key factors can really drive up the price of a window replacement. It's a good idea to know what your vehicle is equipped with before you even start looking for quotes.
These features make the job more complex and, you guessed it, more expensive:
Heating Elements: Those little lines on your rear window are for the defroster, and they need to be carefully reconnected.
Built-in Antennas: If your radio or GPS antenna is embedded in the glass, it has to be hooked up correctly to work.
Factory Tinting: Matching the original factory tint adds another step and requires the right materials.
Sensors: Rain sensors, lane-departure warnings, and other tech have to be perfectly reinstalled and tested.
For a deeper dive into what you can expect to pay, we put together a guide on how much a car window repair costs with more specific price ranges.
Filing an Insurance Claim for Your Window
Good news—if you have comprehensive coverage as part of your auto insurance, your broken window is almost certainly covered. This is the part of your policy that handles damage that isn't from a collision, like theft, vandalism, or a rock kicked up on the highway.
The most important number to know here is your deductible. That's the amount you have to pay out of pocket before your insurance starts paying.
Filing the claim is usually pretty painless. You just need to notify your insurer, and they might point you toward a preferred glass shop like Auto Renu Auto Glass LLC. Going with a preferred provider is often a smoother process because the shop can bill the insurance company directly. All you have to worry about is your deductible.
And if your claim gets denied for some reason? Don't panic. There are steps you can take, and this guide on how to appeal a denied insurance claim provides a clear path forward.
The Importance of a Workmanship Warranty
While the upfront cost is a big deal, the guarantee behind the work is what gives you real peace of mind. Any professional installation should come with a workmanship warranty. This is your safety net against problems that might pop up after the job is finished.
A solid workmanship warranty is a promise of quality. It covers things like air whistles from a bad seal, water leaks during a rainstorm, or rattling that results from an improper installation. This is a critical benefit you simply don't get when you try to do it yourself.
A warranty means that if the seal fails or the window doesn't go up and down smoothly, the installer will fix it on their dime. It's a sign that the technician is confident in their work and a huge factor when choosing who to hire. Always ask about the warranty terms before you commit—make sure you know exactly what’s covered and for how long.
Special Considerations for Modern Vehicles
Swapping out a car window isn't the simple mechanical job it used to be. On a classic car, it was all about nuts, bolts, and getting the glass to sit just right. Today, your vehicle’s glass is a core part of its electronic nervous system, and that makes the replacement job a whole lot more involved.
This isn't just for high-end brands like Tesla or Mercedes, either. The tech has found its way into almost every new car on the road. What looks like a simple piece of glass might actually house antennas, sensors, and the cameras that run your car's most important safety features. A DIY job or a rookie technician can quickly turn a straightforward glass replacement into a major electronic headache.
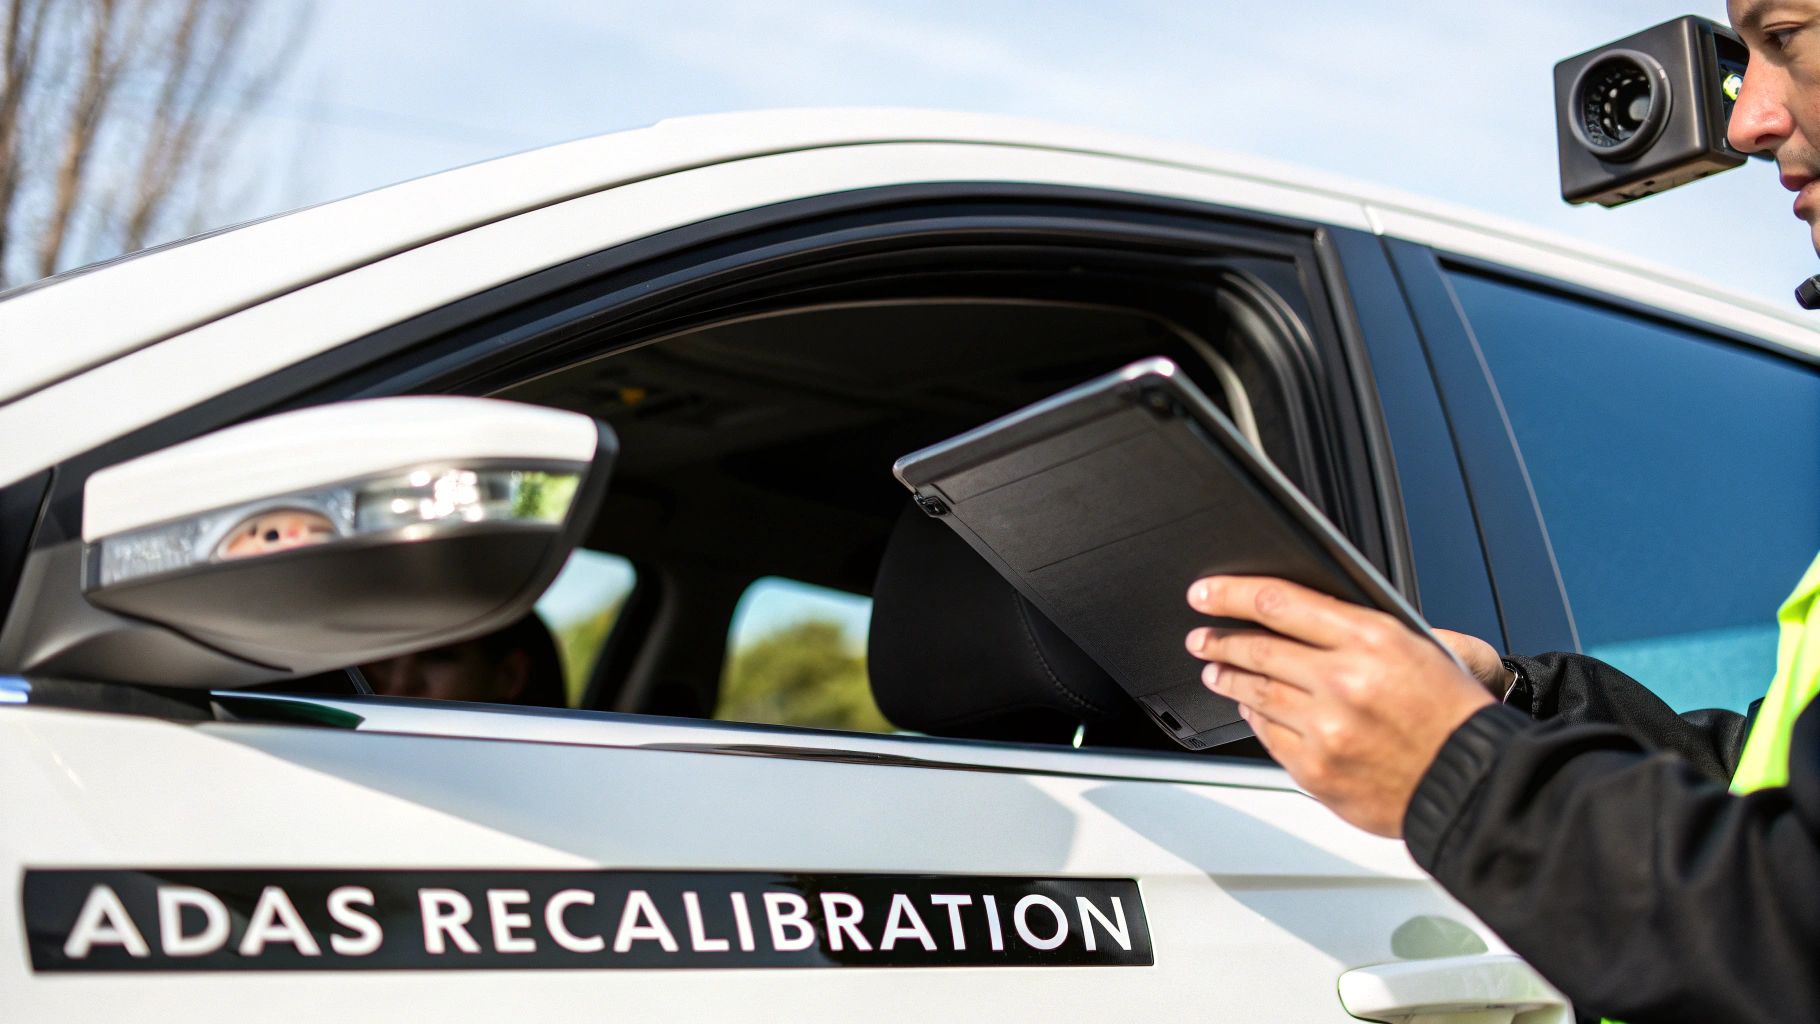
The Critical Role of ADAS Recalibration
The biggest game-changer for modern auto glass is Advanced Driver-Assistance Systems (ADAS). These are the features that help keep you safe, and they all depend on a network of sensors and cameras to do their job. Unsurprisingly, many of these vital components are mounted right on your windshield.
You’re probably using these systems every time you drive:
Lane-Keep Assist: A forward-facing camera reads the lines on the road to help keep you centered in your lane.
Adaptive Cruise Control: Often uses radar and cameras to automatically keep a safe distance from the car in front of you.
Automatic Emergency Braking: This life-saver uses sensors to spot a potential collision and hit the brakes for you.
Collision Warning Systems: These systems use cameras to give you a heads-up about hazards in your path.
When a new windshield goes in, the camera's position can shift just a tiny bit. But a change of a single millimeter or a one-degree tilt is enough to throw the whole system off. This is far more than an inconvenience; it's a massive safety risk. A miscalibrated camera might not see a stopped car or could steer you incorrectly, putting you in real danger.
For this reason, ADAS recalibration is not optional—it is a mandatory step after any windshield replacement on a vehicle with these features. The process demands specialized diagnostic equipment and trained technicians, like our team at Auto Renu Auto Glass LLC, to make sure every safety system is dialed back in to precise factory specs.
More Than Just Clear Glass
On top of the electronics, the glass itself has become incredibly advanced. Automakers are always pushing for better comfort, safety, and efficiency, and the glass plays a surprisingly big role. These new materials demand specific handling and installation methods that are a world away from a standard replacement.
This trend is a major force in the auto industry. The global automotive windshield market is projected to jump from USD 20.4 billion in 2025 to USD 46.2 billion by 2034. This boom is driven by the need for smarter, lighter glass in EVs and cars with advanced heads-up displays—all of which require perfect installation and ADAS recalibration. You can dig into the specifics in this automotive windshield market analysis report.
Specialized Glass Types You Might Encounter
You might be surprised by what's actually in your car's windows. Here are a few common types:
Acoustic Glass: This is laminated glass with a special layer of sound-dampening vinyl sandwiched in the middle. Its job is to dramatically cut down on wind and road noise. If you replace it with standard glass, you'll immediately notice how much louder your car is.
Heads-Up Display (HUD) Glass: Windshields built for HUDs have a specific coating and a unique wedge shape. This is what allows information to be projected clearly without giving you a blurry double image. A regular windshield will render your HUD completely useless.
Panoramic Roofs: These huge glass panels aren't just for looks; they are structural parts of your car. Replacing one takes incredible care, specialized adhesives, and a deep understanding of the vehicle's frame to ensure its integrity isn't compromised.
Hydrophobic Glass: This glass is treated with a special coating that makes water bead up and roll right off, which is a big help for visibility in the rain. It requires careful cleaning and handling to avoid stripping the coating off.
With all these complexities in play, it’s clear that replacing a window on a modern car is a job for a specialist. The risk of messing up your vehicle's safety systems or installing the wrong type of glass is simply too high to leave to chance.
Common Questions About Car Window Replacement
Even after figuring out what needs to be done, you've probably still got a few questions. That's completely normal. Getting solid answers is the best way to feel good about the repair, whether you're trying it yourself or calling a pro. Let's run through some of the questions we get asked all the time.
How Long Will This Take?
This is usually the first thing people ask. Nobody wants their car stuck in a shop for days. The good news is, for an experienced technician, replacing a car window is usually a quick job.
A standard side window can often be swapped out in about 60 to 90 minutes. That includes the whole process—taking off the door panel, installing the new glass, putting it all back together, and cleaning up.
Now, some windows are a bit more involved. A rear windshield with defroster lines and antennas can take a couple of hours. The biggest time factor for windshields and back glass is the adhesive cure time. You simply can't rush that part; it's a critical safety step.
Can I Drive My Car Right Away?
Great question, and the answer is a firm "it depends" on which piece of glass was replaced.
Side Windows: Absolutely. You can drive away immediately. These windows are bolted into a regulator inside the door. Once it's in, it's secure. No waiting necessary.
Windshields and Rear Windows: Nope, you have to wait. This is non-negotiable. These windows are literally glued to your car's frame with a heavy-duty urethane. This adhesive needs time to harden and create a powerful bond.
This waiting period is officially called the Safe Drive-Away Time (SDAT), and it's usually at least one hour, sometimes longer depending on the adhesive and weather. Driving too soon is a serious safety risk. An improperly bonded windshield can fly out in an accident and won't properly support the airbags when they deploy. Your technician will tell you exactly how long you need to let it sit.
Is a Replacement Window as Good as the Original?
It certainly can be, but it all comes down to the quality of the glass and the skill of the installer. A reputable shop will use glass from Original Equipment Manufacturers (OEM) or from suppliers who make glass to the exact same specifications (known as OEM-equivalent or OEE).
This means your new window will have the same:
Thickness, tint, and color
Curvature and exact fit
Durability and safety features
A high-quality replacement, when installed correctly, is completely indistinguishable from the one that came from the factory. Don't be shy about asking your installer what kind of glass they're using. You want the good stuff.
Does My Insurance Actually Cover This?
Most of the time, yes—if you have comprehensive coverage. This part of your policy is for non-collision damage, which is exactly what a broken window from a rock, a break-in, or a stray baseball falls under.
The magic word here is your deductible. That's the amount you have to pay before your insurance starts footing the bill. It's worth checking your policy, though. Many insurers offer a separate, lower deductible (sometimes even $0) just for glass damage because they'd rather you fix a small chip than let it turn into a huge, expensive crack. The easiest way to know for sure is to pull up your policy or give your agent a quick call.
When you just need the job done right without the hassle, a mobile expert is your best bet. At Auto Renu Auto Glass LLC, we bring top-tier service right to your driveway or office. Schedule your mobile auto glass service today!