How to Remove Scratches from Car Glass: how to remove scratches from car glass
Learn how to remove scratches from car glass quickly and safely with simple at-home steps, tools, and tips for a crystal-clear finish.
Jan 8, 2026
generated
how to remove scratches from car glass, windshield scratch repair, auto glass polish, diy scratch removal, cerium oxide glass polish

Before you even think about grabbing a bottle of polish, you need to play detective. The first and most critical step is figuring out exactly what kind of scratch you're dealing with. A light scuff from an old wiper blade is a world away from a deep gouge left by flying road debris.
Getting this initial assessment right is everything. It's the difference between a successful DIY fix and potentially making the problem much, much worse.
First, Assess the Damage
Not all scratches are created equal. Trying to buff out a deep gouge can actually warp the glass by removing too much material. This creates a low spot, a "lens effect" that distorts your vision—a far more dangerous problem than the original scratch ever was.
So, how do you tell the difference? It all comes down to a simple, time-tested trick.
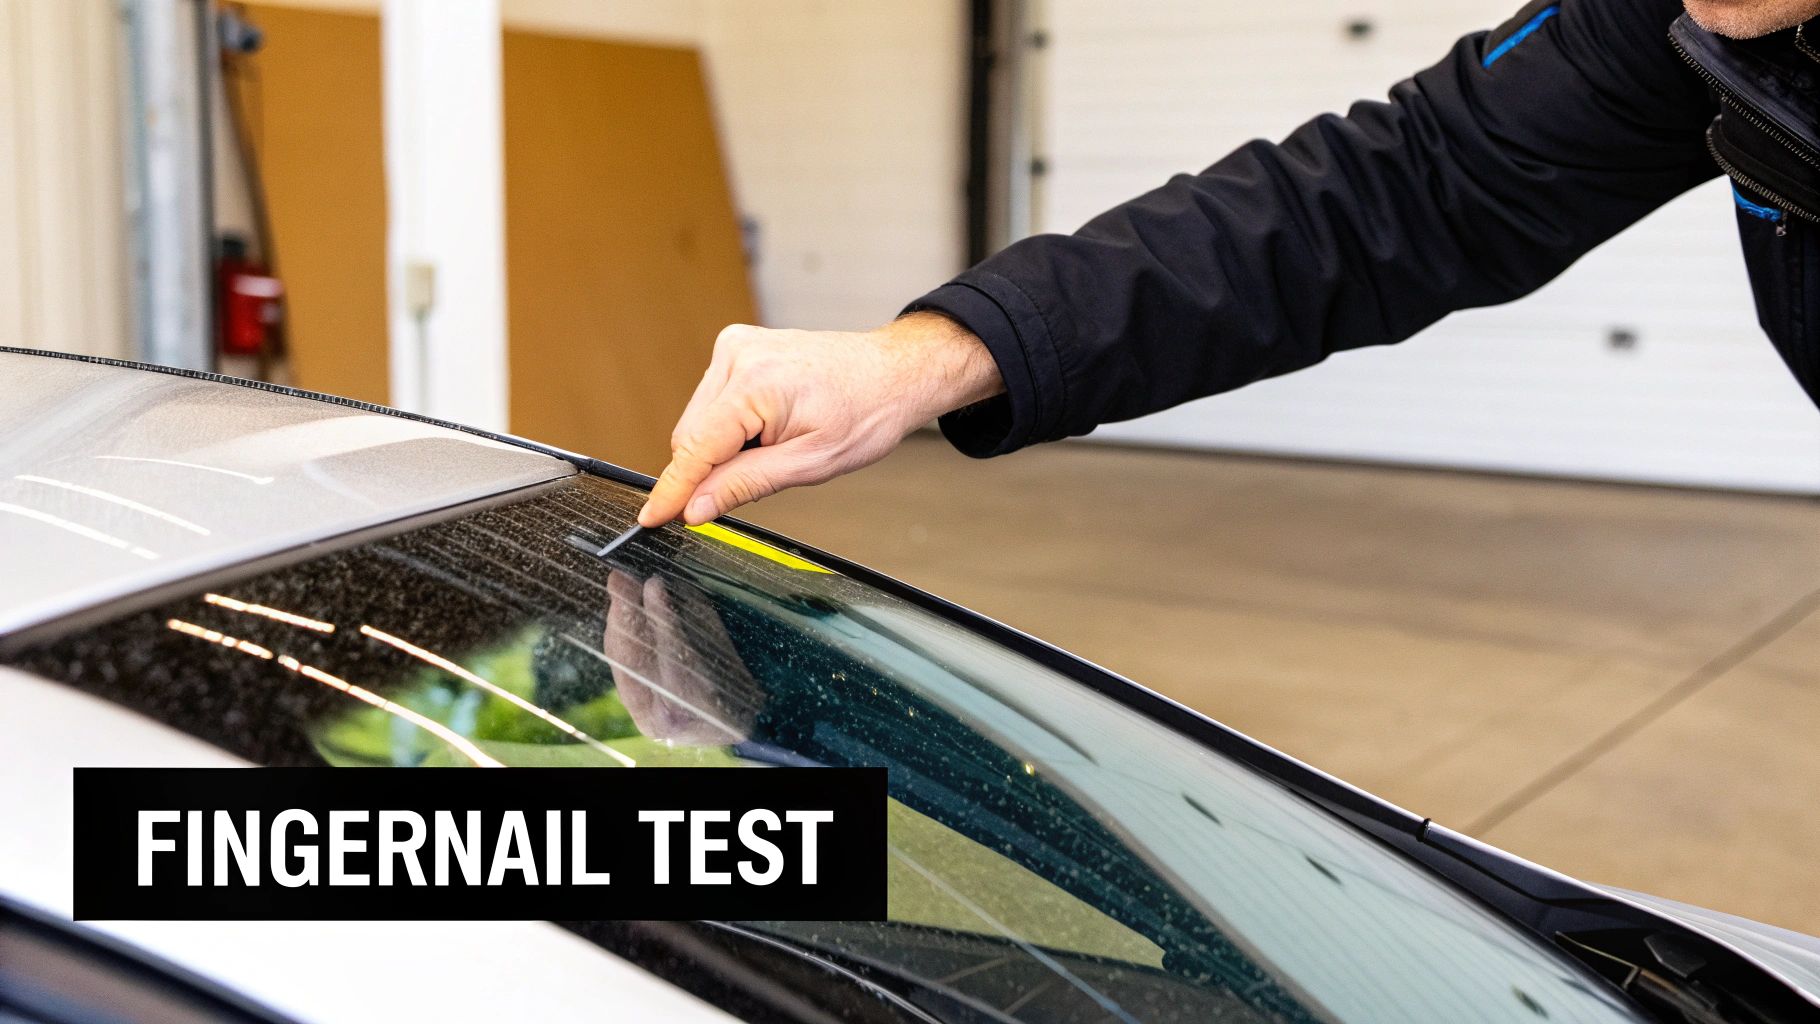
The Fingernail Test: Your Go-To Diagnostic
This is the oldest trick in the book for a reason: it works. To gauge the depth of a scratch, just run your fingernail gently across it.
If your nail glides over the scratch smoothly, you're in luck. This is a surface-level scuff, the kind that DIY polishing methods are designed to handle.
If your nail catches in the groove, stop right there. That scratch is too deep for a simple polish. It's a sign that the damage has gone beyond the surface, and trying to buff it out will only cause more problems.
Key Takeaway: If your fingernail gets stuck in the scratch, don't try to polish it out. You risk creating a visual distortion in the glass, which is especially hazardous when driving at night. This is a clear signal that it's time to call in a professional.
This simple decision tree lays out the process perfectly.
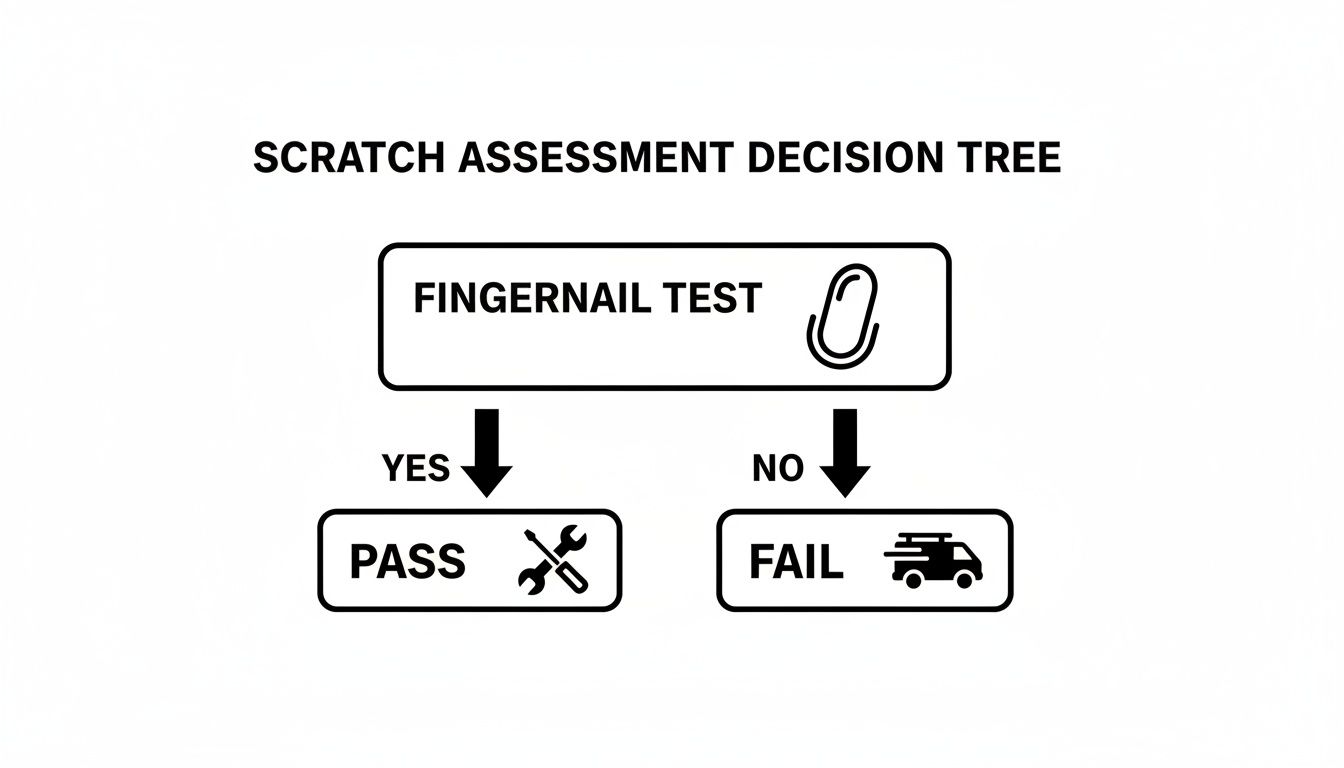
If your fingernail doesn't catch, a DIY approach is on the table. If it does, professional repair is the only safe bet. Sticking to this rule prevents you from turning a minor annoyance into a major safety issue.
Scratch Severity Assessment Guide
Use this quick reference to identify the scratch on your car glass and determine whether a DIY fix is possible or if it's time to call a professional.
Scratch Type | Fingernail Test Result | Visual Appearance | Recommended Action |
|---|---|---|---|
Light/Surface Scuff | Nail glides over smoothly, no catch. | Faint lines, often from wiper blades or dirty rags. | DIY Repair: Polish with compounds like cerium oxide. |
Deep Scratch | Nail catches distinctly in the groove. | A clear, defined line you can feel and see easily. | Professional Repair: Do not attempt a DIY fix. |
Chip | Nail catches on the edge of a small crater. | A small pit or divot, often with radiating lines. | Professional Repair: A resin injection is likely needed. |
Crack | Nail catches and can run along a line. | A visible line running across the glass surface. | Professional Repair/Replacement: Immediate attention required. |
Ultimately, this table reinforces the importance of the fingernail test as your primary diagnostic tool before you proceed with any hands-on work.
Minor windshield damage is incredibly common. In the U.S. alone, it's estimated that between 24–37 million vehicles have repairable damage at any given moment, and much of that starts as a fine scratch.
Once you've handled the existing damage, it's smart to think about prevention. Consider looking into something like XPEL Windshield Protection Film to give your glass an invisible shield against future chips and scratches.
Setting Up Your Workspace for a Flawless Repair
Before you even think about mixing a polishing paste, a few minutes of prep work can make the difference between a great result and a frustrating one. Getting your car and your tools ready is the secret to a professional-looking repair. It's all about creating a controlled environment where you can focus on the scratch without causing new problems.
First things first, get your car out of direct sunlight. A garage or even a shady carport is perfect. If you try to work on hot glass, your polishing compound will dry out almost instantly, losing its effectiveness and potentially creating a hazy mess or even more fine scratches. You need a cool surface to work with.
Your Essential Supply Checklist
Having everything you need within arm's reach saves a ton of headaches. You don't need a professional-grade workshop, just a few key items to get the job done right. Here’s a quick rundown of what I always have on hand:
Automotive Glass Cleaner: Don't grab the Windex from under the sink. Household cleaners often have ammonia or soaps that leave a film behind, which will interfere with your repair. Stick to a dedicated auto glass cleaner.
High-Quality Microfiber Towels: You’ll want at least two—one for the initial cleaning and a fresh, dry one for buffing away the compound later. They’re designed to lift dirt away without scratching the surface.
Painter's Tape: This is your best friend for protecting the paint and trim around the glass. A few minutes of masking can save you from an "oops" moment with the abrasive polish.
Spray Bottle with Water: A light mist of water is crucial for keeping the glass lubricated as you polish. This prevents heat from building up and helps the compound glide smoothly.
Safety Gear: Don't skip this. Seriously. A pair of safety glasses will protect your eyes from any sling, and gloves will keep the messy compound off your skin.
A pristine surface is non-negotiable for any glass repair. Contaminants like dust or road grime can get trapped under your polishing pad and create more scratches than you started with, completely defeating the purpose of the repair.
For tips on getting that perfectly clean starting point, our guide on how to clean your windshield without streaks has you covered. Once your workspace is clean, cool, and protected, you’re ready to get to work on the scratch itself.
Simple DIY Fixes for Minor Surface Scratches
If you're dealing with those faint, hairline scratches that your fingernail glides right over, you don't necessarily need to call for backup just yet. A few common household items can often buff out these minor imperfections, but the trick is to start with the mildest option first.
Before you touch the glass, make sure it’s completely clean and cool. Any speck of dirt left behind can get caught in your polishing compound and create a whole new set of scratches, which is the last thing you want. Always work in the shade, never in direct sunlight, as the heat can cause your polishing compound to dry out too quickly.
The Toothpaste Trick for Ultra-Fine Scuffs
It might sound a little strange, but your first line of defense could be sitting in your bathroom cabinet. A basic, non-gel whitening toothpaste has micro-abrasives designed to polish tooth enamel, and that gentle grit is often just enough to smooth out the finest scuffs on glass without causing any harm.
Here's what you need to do:
Pick the right kind: Grab a white, non-gel toothpaste. The ones with baking soda are even better, as they have a little extra polishing power. Gels won't work here; they don't have the necessary abrasive texture.
Apply a small amount: Squeeze a small dab of toothpaste directly onto the scratch.
Buff it out: Using a clean microfiber cloth, rub the paste into the scratch with firm, steady pressure. Go in small, overlapping circles for a few minutes to polish the area evenly.
Once you’re done, wipe the residue away with a damp cloth and dry the area to check your progress. This method is really only effective for the most superficial marks, like those left behind from a dirty cleaning towel.
Stepping It Up with a Baking Soda Paste
If the toothpaste didn't quite cut it, your next best bet is a simple paste of baking soda and water. Baking soda is a slightly stronger abrasive but is still gentle enough for light scratches that are a bit more stubborn.
Mix equal parts baking soda and water in a bowl until you get a thick, pudding-like consistency.
Pro Tip: Keep a spray bottle of water nearby. If you feel the paste drying out as you work, give the area a light mist. Keeping it lubricated is key to preventing heat buildup and letting the abrasive particles do their job smoothly.
Apply the paste to the scratch and, using the same technique as before, polish with a clean microfiber cloth and firm, circular motions. This might take a bit more elbow grease—plan on buffing for a solid 5-10 minutes. When you're finished, rinse the glass thoroughly.
Getting Serious with Cerium Oxide
When you want a result that's as close to professional as you can get at home, it's time for cerium oxide. This fine powder, sometimes called "jeweler's rouge," is what the pros use to polish glass and remove those annoying scratches, like the ones left by worn-out wiper blades. You can usually find it as the main ingredient in most auto glass repair kits.
For a deeper dive into that specific problem, our guide on windshield wiper scratch removal has some great advice.
First, you'll need to mix the cerium oxide powder with water to create a slurry. Add water slowly until it feels like a creamy, thin glue. Apply this mixture to the scratch and use a felt polishing pad (or a clean cloth in a pinch) to buff the area. Use consistent, circular motions and moderate pressure. This isn't a quick fix; it takes patience to gently level the glass around the scratch until it vanishes.
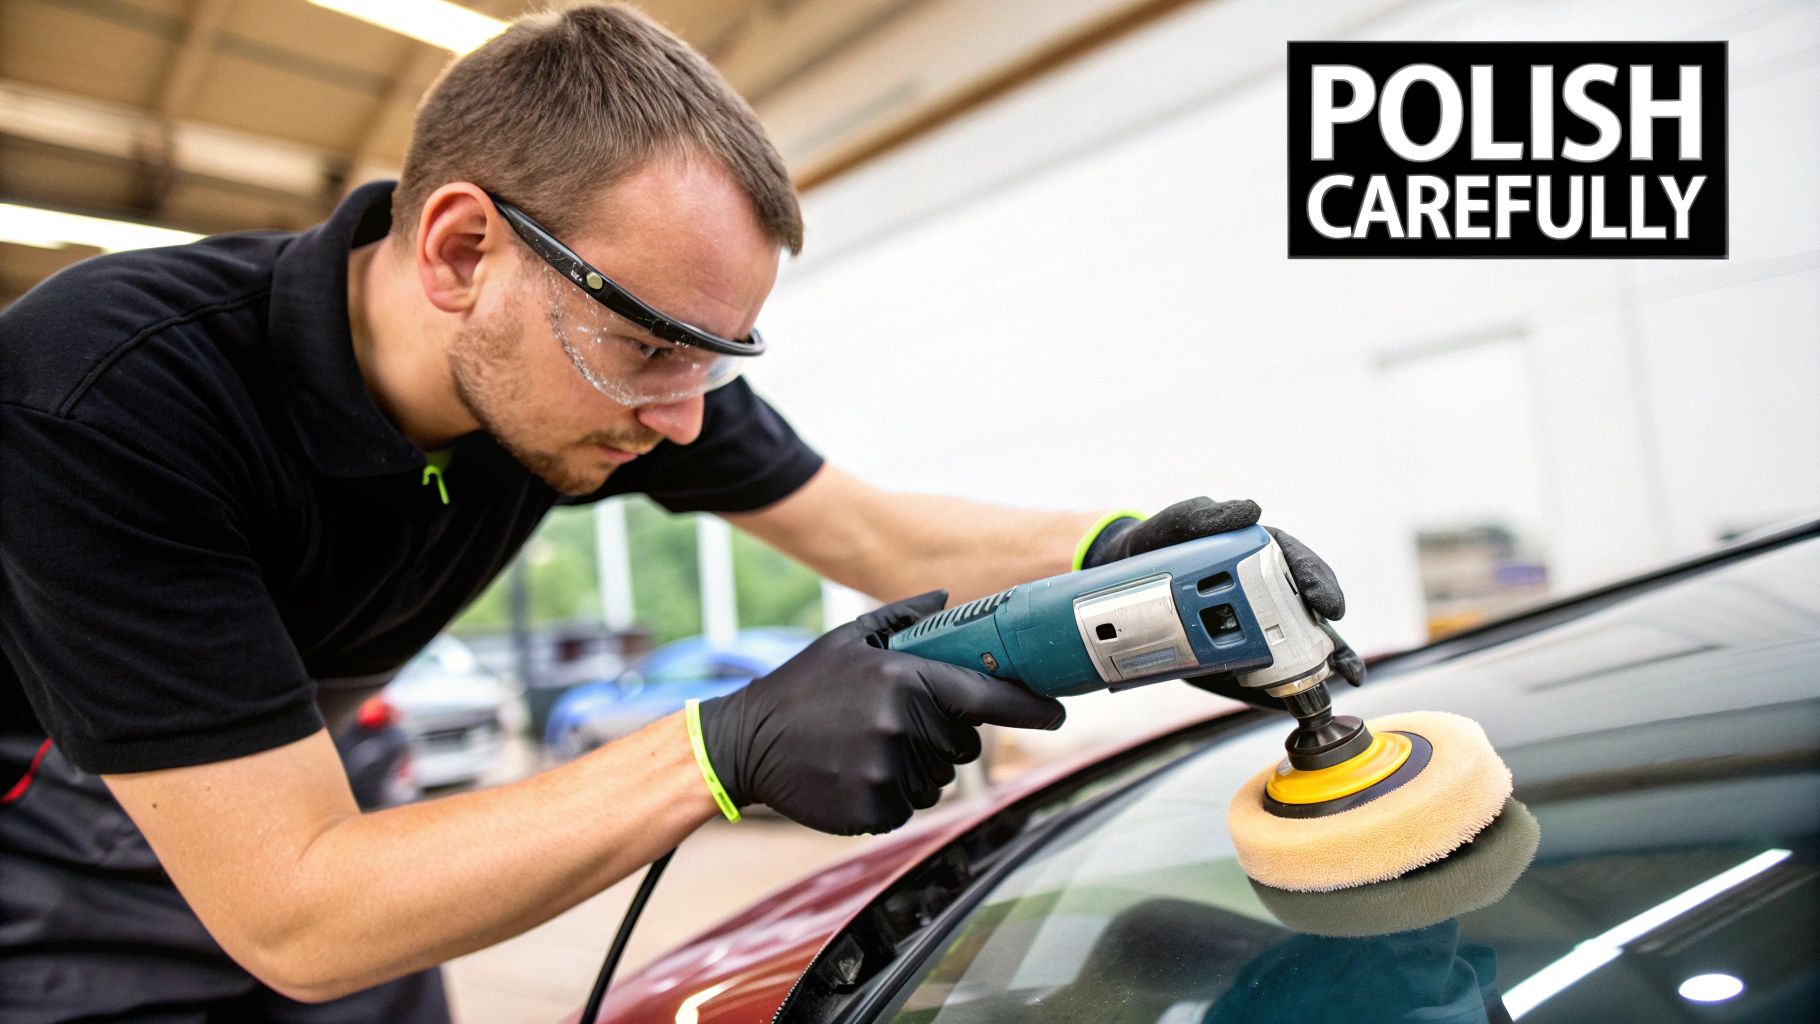
Using a Polishing Tool for Moderate Scratches

When you’ve tried buffing by hand and that annoying scratch just won't budge, it's time to step up your game. For those more stubborn scratches—the kind left by a gritty old wiper blade or a light branch scrape—a rotary tool paired with a good polishing compound is going to be your best friend. This is the next level of DIY repair, perfect for someone comfortable with power tools and ready for a more serious approach.
Think of this process as micro-sanding. You’re gently grinding down the glass surface around the scratch until it's level with the bottom of the groove, making the scratch disappear. It’s an incredibly effective way to remove scratches from car glass, but it demands a steady hand and a bit of patience to get it right.
Gearing Up for the Job
First things first, let's get your toolkit in order. Having the right gear isn't just about making the job easier; it's about protecting your windshield from accidental damage. This isn't a job for a high-speed angle grinder, so leave that on the shelf. We're looking for control, not brute force.
Here’s your shopping list:
A Variable-Speed Polisher: You can use a corded drill, but a dedicated polisher gives you far better speed control, which is key. You'll need to keep the RPM (revolutions per minute) low to prevent the glass from getting too hot.
Felt or Rayon Polishing Pads: These are specifically made for glass. They have enough bite to work the polishing compound in but are soft enough not to add new scratches to the mix.
Cerium Oxide Powder: This is the secret sauce. It’s a super-fine abrasive that polishes glass to a crystal-clear finish without gouging the surface.
Spray Bottle with Water: This is non-negotiable. You'll need it to keep the glass cool and lubricated throughout the entire process.
Mixing and Applying the Slurry
The cerium oxide powder needs to be mixed with water to form a paste, or what we call a slurry. You're looking for a consistency like thin yogurt or creamy glue. It should be thick enough to cling to the pad but wet enough to spread easily without drying out too fast.
Once you’ve got your mix right, dab a small amount onto your polishing pad. Then, press the pad against the glass before you turn the tool on—this little trick prevents the slurry from splattering all over your car (and you).
Start your polisher on its absolute lowest speed setting.
Crucial Safety Warning: The number one rule is to never let the glass get hot. Heat can cause micro-fractures, or worse, a permanent distortion called "hazing" that looks like a blurry spot. If the glass feels even slightly warm to the touch, stop, and give it a good misting of cool water.
Now, begin working the polisher over the scratch in slow, overlapping patterns. Go side-to-side, then up-and-down, making sure to work about an inch beyond the scratch itself. This helps blend the repair into the surrounding glass, preventing a noticeable dip or "lens effect."
Let the machine do the heavy lifting. You don't need to press down hard—that's a rookie mistake that can warp the glass and distort your view of the road. This isn't a race. It might take a few passes to fully buff out the scratch. Every so often, stop, wipe the area clean with a microfiber towel, and check your progress from a few different angles. A patient, methodical process is what gets you that perfect, distortion-free finish.
Knowing When to Call a Professional
There’s a real satisfaction in fixing something yourself, but the smartest car enthusiasts know when to put the tools down. With auto glass, knowing your limits isn't just about saving time—it's about safety. Pushing a DIY repair past its breaking point can cause permanent damage and even compromise your car's structural integrity.
The best rule of thumb is still the one we mentioned earlier: the fingernail test. If you run your fingernail across the scratch and it catches, that's your cue to stop. A scratch that deep is beyond a simple surface-level polish, and trying to buff it out will almost certainly create a dangerous visual distortion in the glass.
Red Flags That Demand an Expert
Beyond the fingernail test, a few other situations are non-negotiable—they require a professional, period. Ignoring these signs can lead to bigger problems down the road.
Here’s when you need to make the call:
Any Visible Chips or Cracks: Even a tiny chip is a weak spot waiting to spread. A pro can often use a resin injection to stabilize it, but that requires specialized tools to do it right.
Damage in the Driver’s Line of Sight: This is a zero-tolerance area. Attempting to polish out a scratch here can create a subtle warp or "lens effect." You might not notice it in the garage, but it can dangerously distort your view of the road, especially at night when facing oncoming headlights.
Deep Scratches or Gouges: If you can easily feel the scratch, it’s too deep for a home remedy. Professionals have the right techniques and equipment to handle these without weakening the glass.
A car’s windshield provides up to 30% of its structural strength, especially in a rollover accident. A deep scratch or an ignored chip is a failure point that compromises this crucial safety feature. Professional repair is about maintaining that integrity.
The Critical Role of ADAS Recalibration
Modern cars are loaded with tech. Many windshields are now home to a suite of cameras and sensors for Advanced Driver-Assistance Systems (ADAS)—the brains behind features like automatic emergency braking and lane-keeping assist.
If a scratch is bad enough to need professional work or a full replacement, those ADAS systems must be recalibrated. Skipping this step can cause these essential safety features to fail when you need them most. Recalibration is a precise process that only a qualified technician with the right diagnostic tools can perform. Our guide on when to replace your windshield dives deeper into this important topic.
With more cars on the road than ever, minor glass damage is a fact of life. Millions of vehicles pick up fine scratches from road debris and wiper blades every year. For a mobile glass pro, knowing the difference between a harmless scuff and a scratch that requires expert repair—and potential ADAS recalibration—is a critical part of the job. You can discover more insights about the automotive glass market on technavio.com.
Common Questions About Car Glass Repair
When you're staring at a scratch on your car's glass, a ton of questions probably pop into your head. We get it—we've heard them all from drivers over the years. Let's walk through some of the most common ones so you can tackle this with confidence and make the right call for your car.
Can I Use a General Scratch Remover on My Windshield?
It's really tempting to just grab a generic scratch remover off the shelf at the auto parts store, but I'd strongly advise against it. Think of it this way: you wouldn't use sandpaper on a camera lens, right? Most of those all-purpose products are designed for paint or plastic, which are much softer than glass.
Using the wrong stuff on your windshield can create a permanent, hazy mess. Even worse, it might strip off factory coatings or dig into the glass, making the original scratch look like a minor issue. You absolutely need a product specifically formulated for automotive glass, and the magic ingredient to look for is cerium oxide. Even then, if the scratch is deep enough to catch your fingernail, you risk distorting the glass. And if your car has a special rain-repelling coating, it's best to call a pro to avoid ruining it for good.
Does Car Insurance Cover Scratch Repair?
This is a big one, and the answer is a classic: it depends on your policy. The good news is that many comprehensive insurance plans have specific "glass coverage," often with a very low or even a $0 deductible. Insurance companies would much rather pay for a small repair than foot the bill for an entire windshield replacement later on.
The catch? Insurance typically only covers damage that affects your vision or the structural integrity of the glass. A purely cosmetic scratch that isn't in your direct line of sight probably won't be covered.
Our Advice: Your best bet is to give your insurance agent a quick call before you do anything. Ask them point-blank about your glass coverage. We're also happy to help you navigate the claims process to make it as painless as possible.
How Do I Prevent Future Scratches on Car Glass?
An ounce of prevention is worth a pound of cure, especially with auto glass. A few simple habits can save you a lot of headaches down the road.
Keep Your Wipers Clean: Wipe down the rubber blades with a cloth and a little rubbing alcohol every so often. You'd be surprised how much abrasive grit they pick up. Plan on replacing them every 6 to 12 months—or sooner if they start streaking.
Don't Run Wipers on a Dry Windshield: This is a major cause of fine scratches. Always spray some washer fluid first to give the blades something to glide on. Running them over a dry, dusty, or icy windshield is like dragging sandpaper across the glass.
Leave Some Space: This might be the most important tip. Keeping a safe following distance, especially behind large trucks, is your best defense against flying rocks and road debris.
Sometimes, the window itself is fine, but the mechanism inside the door is the problem. If your window is stuck, slow, or makes weird noises, you might be dealing with a different issue altogether. You can learn more about replacing a car window regulator to see if that's what's going on. A healthy window system involves more than just the glass.
At Auto Renu Auto Glass LLC, we're ready to help with any glass problem you have, from tiny scratches to complete replacements. If you're on the fence about a DIY repair or just want a professional to handle it, contact us for quick and dependable mobile service anywhere in the Bay Area. Head over to https://www.autorenu911.com to get a free quote today.