Guide on how to replace rear car window (DIY)
Learn how to replace rear car window with this complete DIY guide. Discover tools, safe removal, and professional installation tips.
Oct 25, 2025
generated
how to replace rear car window, diy auto glass, rear window replacement, car window installation, automotive repair

Replacing your car's rear window is a big job. You'll need to pull off the interior trim panels, carefully unplug the defroster grid, cut through the old urethane seal, and prep the frame before you can even think about setting the new glass. It demands patience, the right tools, and a steady hand to get a perfect, leak-proof seal.
This guide will walk you through what's involved, so you can make an honest call about whether this is a project you should take on.
Deciding If You Should Replace Your Own Rear Window
Before you even think about buying the glass, let's have a frank discussion about tackling this yourself. Knowing the steps is one thing, but pulling it off without a hitch is a completely different ballgame. This isn't like changing your oil; it's a high-stakes DIY project where a small mistake can cause big problems.
A bad installation can lead to frustrating wind noise, water leaks that can ruin your interior, and even rust forming on the car's frame over time. It’s a job with very little room for error.
The rear window is more complex than it looks. Unlike a windshield, it has its own set of challenges:
Tempered Glass: Most rear glass is tempered, meaning if it breaks, it explodes into a million tiny, pebble-like pieces. This makes the initial cleanup a huge, meticulous job.
Defroster Lines: Those little orange lines are your rear defroster. They're delicate and need to be reconnected perfectly to work.
Embedded Antennas: Many cars now have radio, GPS, or other antennas built right into the glass, which means more wiring to deal with.
The Cost and Complexity Equation
The automotive glass industry is huge—it's projected to hit USD 30.6 billion by 2027, and a lot of that comes from replacements just like this. While a rear window doesn't get hit with rocks as often as a windshield, the replacement cost can still be steep, running anywhere from $200 to over $1,000 for luxury or tech-heavy vehicles.
That potential savings is what lures many people into trying it themselves. But you have to weigh that against the risks.
The single biggest mistake I see first-timers make is trying to do it alone. Rear windows are heavy, awkward, and unwieldy. Trying to lower one perfectly onto a sticky bead of urethane by yourself is nearly impossible. You need a second person, period. Otherwise, you’re likely to smudge the seal or, even worse, drop and shatter your brand-new piece of glass.
To help you figure out the best path forward, let's break down the pros and cons.
DIY vs Professional Rear Window Replacement
This table should help you decide which replacement option is right for you.
Factor | DIY Replacement | Professional Service |
|---|---|---|
Cost | Lower upfront cost (parts only) | Higher cost (parts + labor) |
Time | Can take 4-8 hours or more for a first-timer | Usually done in 1-2 hours |
Tools | Requires specialized tools (cold knife, urethane gun) | Technicians have all necessary professional-grade tools |
Risk | High risk of leaks, wind noise, or broken glass if done incorrectly | Low risk; work is typically guaranteed or warrantied |
Skill Level | Advanced; requires precision and patience | No skill required from the car owner |
Ultimately, making an informed choice comes down to being honest about your skills, your tools, and your patience. This isn't a project where you can cut corners. If you’re still gathering information, our overview of auto glass replacement can offer some broader context. The decision isn't just about saving money—it's about investing your time wisely and avoiding a headache that costs more in the long run.
Getting Your Gear Together and Sourcing the Right Glass
Before you even think about touching the car, you've got to have the right gear. Trying to tackle a rear window replacement without the proper tools isn't just a bad idea—it's a surefire way to end up with a leaky mess or a broken new window. A clean, professional, and leak-proof seal depends entirely on what you have laid out next to you.
Think of it like prepping for surgery. You need every tool in its place, clean and ready to go, because once you start laying that urethane bead, the clock is ticking.
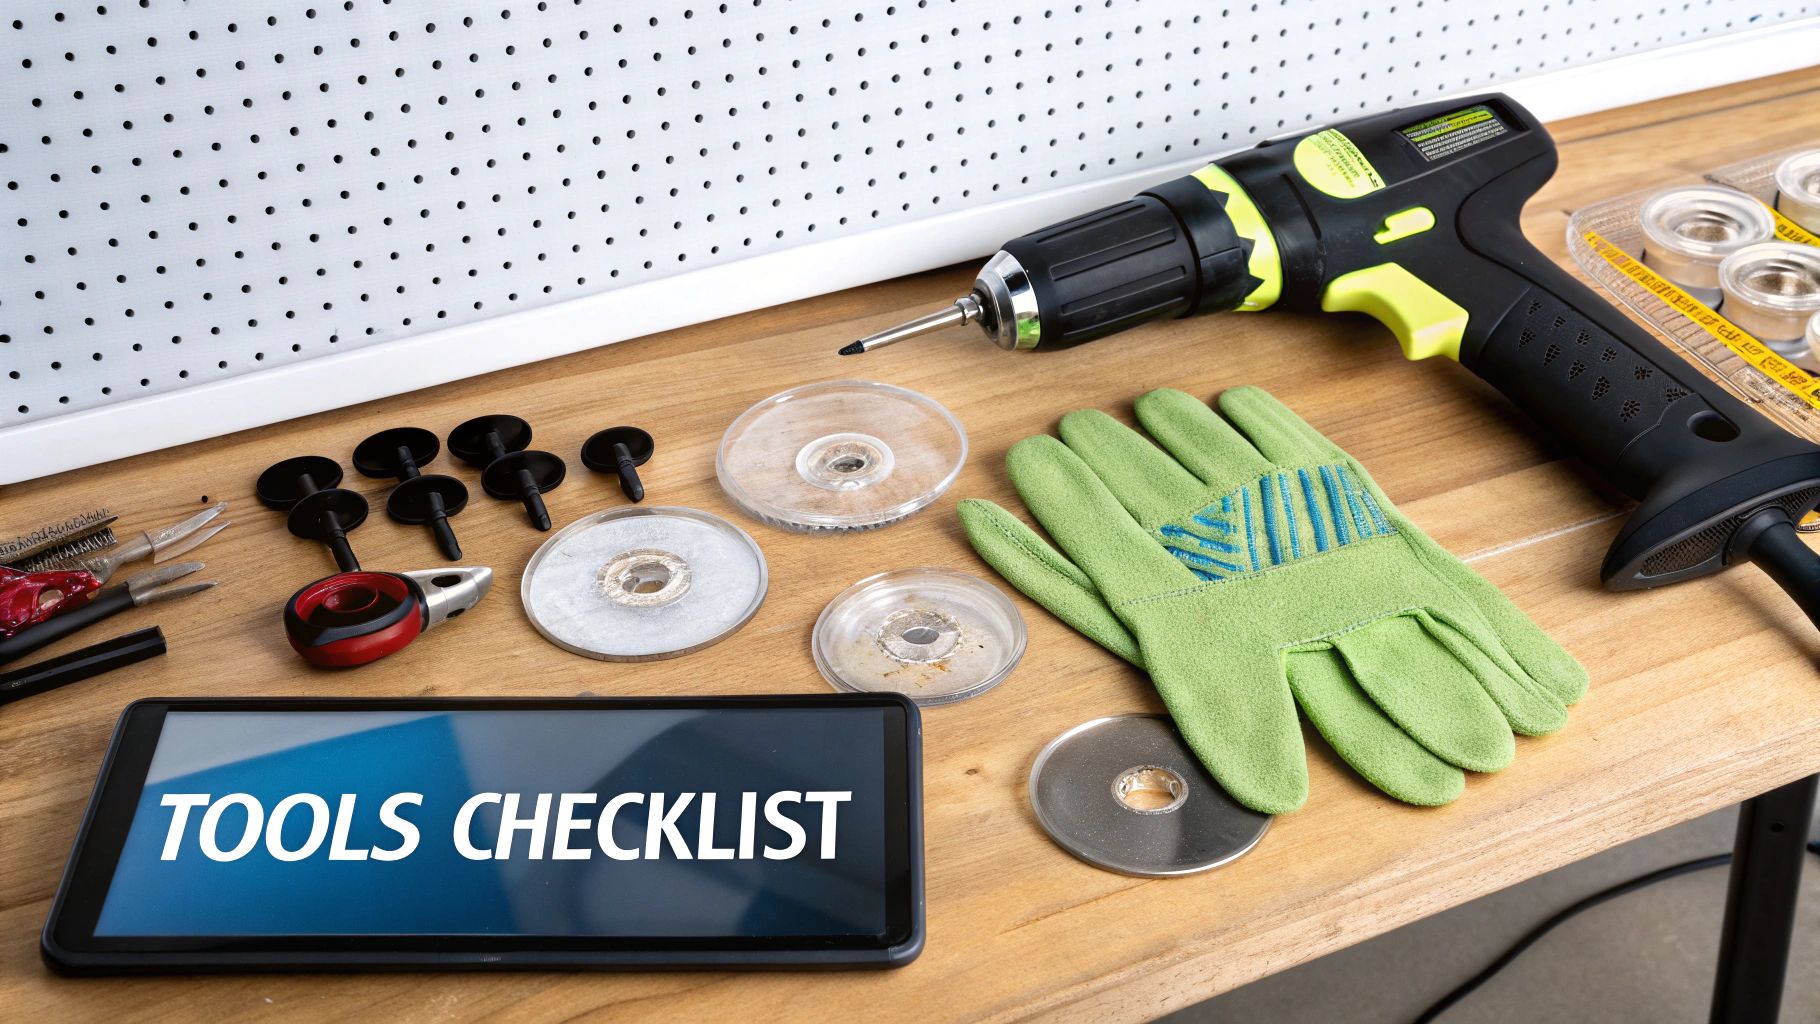
Your Essential Tool Checklist
There's nothing worse than getting halfway through a job only to realize you're missing a critical tool. Take a few minutes to gather everything on this list. Trust me, it will save you a massive headache later.
Heavy-Duty Suction Cups: These are your best friends for this job. A rear window is heavy and awkward, and these are the only safe way to lift and set it in place without fumbling. You'll want two of them, one for you and one for your helper.
A Solid Urethane Caulking Gun: Don't skimp here. A cheap, flimsy gun from the hardware store won't cut it. You need a high-ratio or even an electric model that can push that thick urethane out in a smooth, consistent bead. An uneven bead means an inevitable leak.
Cold Knife or Wire-Out Tool: This is what you'll use to cut through the old, hardened urethane. A cold knife with a fresh blade is a good start, but a specialized wire-out tool often works better, especially in those tight corners.
Utility Knife & Scrapers: Once the old glass is out, you'll need these to meticulously trim the old urethane down on the car's frame (the pinch weld).
Safety Gear: This is non-negotiable. Get yourself a good pair of safety glasses and some heavy-duty gloves. Tempered glass shatters into a million tiny, sharp pieces, and the car's frame has plenty of sharp edges.
I see this all the time: people seriously underestimate how tough old urethane is. They try to muscle through it with a dull blade, get exhausted, and end up scratching the paint right down to the metal. Do yourself a favor and start with a brand-new, razor-sharp blade.
Finding the Perfect Replacement Glass
Not all glass is the same, and getting an exact match for your vehicle is absolutely crucial. Modern rear windows are complex—they often have defroster grids, radio antennas, and other tech built right in. Your Vehicle Identification Number (VIN) is the key to getting this right.
When you call a glass supplier, lead with the VIN. It tells them everything they need to know about your car's specific make, model, year, and trim. This simple step eliminates all the guesswork and ensures the window that shows up has the right curvature, size, and electrical hookups.
You'll also face a choice: OEM (Original Equipment Manufacturer) or aftermarket glass.
OEM glass is identical to the one installed at the factory, so you know the fit and quality are perfect. Aftermarket glass is made by a third-party company. While it's usually less expensive, the fit and finish can sometimes be a bit off. For something as important as your rear window, spending a little extra on OEM glass can give you real peace of mind.
Removing the Old or Damaged Rear Window

Alright, with your tools laid out and the new glass on standby, it's time to get your hands dirty. Removing the old window isn't about brute force; it’s a job that demands a slow, steady hand. This is the stage where mistakes happen. If you rush it, you’ll end up with scratched paint, broken interior panels, and a whole lot of frustration.
Your mission is simple: get the old glass out in one piece (if possible) while protecting every square inch of your car's paint and interior from damage.
Prepping the Work Area
Before a single tool touches your car, you need to prep the area like a surgeon preps an operating room. Your goal is to completely isolate the rear window from the rest of the car to prevent any collateral damage from glass shards or a slipped tool.
Start by grabbing some high-quality painter's tape and carefully masking off the paint around the entire rear window. I always recommend a 2-3 inch border. This simple step is your best line of defense against an accidental slip that could scratch the pinch weld and invite rust to the party later on.
Next, shift your focus to the inside. Toss some old blankets or a heavy-duty drop cloth over the rear seats, the package tray, and anywhere else that could get hit with debris. If your window is already shattered, this isn't optional—it's the only way to contain the thousands of tiny glass cubes that will go everywhere.
Disconnecting Wires and Popping Off Trim
With everything protected, it's time to deal with the trim and wiring. Most rear windows have a defroster grid, which connects to your car's electrical system through a couple of small wires, usually tucked away near the top or side.
Find the small connectors where the wiring harness meets the glass. A pair of needle-nose pliers or even a small flathead screwdriver will help you gently pry them loose. Whatever you do, never pull on the wires themselves. It’s a surefire way to damage the fragile grid lines baked into the glass.
Now, let's talk about those interior trim panels. They're typically held in place by a series of hidden plastic clips that love to snap.
Look up a vehicle-specific guide if you can. Knowing the clip locations is half the battle.
Always use plastic pry tools. A metal screwdriver will absolutely chew up your plastic trim and headliner.
Apply firm, even pressure to pop the clips. A sharp jerk is what breaks them.
There's no sound more maddening to a DIYer than the snap of an old plastic clip. Take your time here. Feel for the resistance and work your way around the panel. Spending an extra ten minutes now is way better than trying to fix a rattling trim piece for the rest of the car's life.
Cutting Through the Urethane Seal
If the glass is still in one piece, you have to cut it free from the tough urethane adhesive that bonds it to the car's frame. This stuff is incredibly strong, so you'll need a specialized tool like a cold knife or a wire-out tool to get through it. The technique is nearly identical for both back glass and windshields. In fact, many of the same principles apply, as you can see from our general process for https://www.autorenu911.com/windshield-replacement.
Take your cold knife, find a corner to start, and carefully work the blade between the glass and the car's body. Once it's in, pull the knife along the seal with a steady, sawing motion. Be prepared to use some muscle—this requires significant and consistent force.
Dealing with Shattered Glass
If you’re starting with a window that’s already shattered, your job is less about cutting and more about careful cleanup. After you've removed the large, loose chunks of glass, your shop vac becomes your best friend.
Go over every single surface inside the car: the seats, the carpet, down in the crevices, and all along the door jambs. Proper handling of sharp materials is a core part of general workplace safety compliance, and that discipline is just as important in your own garage. Any piece of glass left behind is a cut waiting to happen, so be meticulous.
Getting the Frame Ready for a Watertight Seal
Now that the old glass is out, you've reached the most critical part of the whole job: prepping the pinch weld. This metal frame is where your new window will live, and without a perfect, watertight seal, that new glass is useless. Trust me, rushing this step is the single biggest reason DIY replacements fail. It's what leads to that annoying wind whistle, water leaks, and eventually, rust creeping in.
A rock-solid bond isn't just about squirting on new adhesive. It's about getting the frame surgically clean so the urethane has something to really bite into. The slightest bit of dust, oil from your skin, or old gunk can kill the seal. The goal here is to get that frame looking as clean as it did the day it rolled off the assembly line.
Trimming Down the Old Urethane
First things first, you need to deal with the old urethane. You’re not trying to scrape it all the way down to the bare metal. In fact, leaving a thin, flat base of about 1-2 millimeters actually gives the new adhesive a better surface to bond with. Think of it as trimming, not a complete removal.
Grab a sharp scraper or a fresh utility knife and carefully shave down the old bead. You want to keep your blade almost flat against the pinch weld to avoid digging into the metal. The key is to create a uniform, smooth surface all around the frame. Go slow, especially in the corners where the old urethane loves to pile up.
Here's a pro tip: You're essentially creating a perfect gasket from the old material. A smooth, even base layer is a far better foundation for new urethane than a lumpy, gouged-up surface.
Once it's all trimmed down, give the entire pinch weld a good wipe with a lint-free cloth and some isopropyl alcohol. This gets rid of any lingering dust or greasy fingerprints, leaving you with a chemically clean surface ready for the next phase.
Priming for a Permanent Bond
This is the step that separates a quick fix from a professional, long-lasting repair. Primer does two crucial things: it prevents rust and it helps the adhesive stick like crazy. If you nicked the paint and exposed bare metal while trimming—and it happens—you absolutely have to treat those spots.
Dab a little automotive metal primer on any scratches. This seals the metal from moisture, stopping rust in its tracks. Even a tiny rust spot under the seal can grow and will eventually destroy the bond, causing a massive leak down the road.
Next up is the urethane primer. This black liquid is basically a chemical handshake, creating an unbreakable molecular bond between the car's frame, the adhesive, and the new glass.
For the Frame: Brush a thin, even coat of urethane primer right over the trimmed urethane and any metal spots you just primed.
For the Glass: Apply the primer to the black ceramic edge of the new window (that's called the "frit"). That's the part engineered to bond with the urethane.
Always let the primer dry completely. Check the manufacturer's instructions, but it usually takes about 10-15 minutes. Once it’s cured, you’ve got a perfectly prepped surface, ready for a permanent, factory-grade seal.
Getting the New Rear Window Installed Just Right
Alright, the frame is clean, primed, and ready to go. Now for the main event: installing the new glass. This is where a steady hand and a little patience really pay off. The next few steps are what separate a factory-perfect, leak-proof seal from a major headache down the road.
The secret to a rock-solid installation lies in how you apply the urethane adhesive. Before you do anything else, grab the nozzle for the urethane tube and cut it into a "V" shape. This isn't just a random tip; it's a technique the pros use to create a tall, triangular bead. When you set the glass, this specific shape collapses perfectly, creating a watertight seal that grabs the glass and the frame.
Laying the Perfect Urethane Bead
Before you start pumping urethane, do a quick "dry run." Take your caulking gun and trace the entire perimeter of the frame without actually squeezing the trigger. This little practice lap lets you get a feel for the movement, spot any awkward corners, and figure out how you'll need to shift your body to get it done smoothly.
Feeling confident? It's time to lay the bead. Apply a continuous, even line of urethane right down the middle of the old adhesive you trimmed on the pinch weld.
Pacing is key. Go too fast and the bead will be thin and weak. Too slow, and you'll get a big, goopy mess that oozes out everywhere when you set the glass.
Keep a consistent angle. Try to hold the caulking gun at a 90-degree angle to the frame for the best results.
Don't stop and start. Once you begin, commit to going all the way around in one clean motion. Pausing creates weak spots that are prime candidates for future leaks.
Take a deep breath before you start. There's really no fixing a bad urethane bead; if you mess it up, the only option is to scrape it all off and start from scratch. Focus on one smooth, unbroken line.
This quick infographic recaps the critical prep work that gets you to this point.
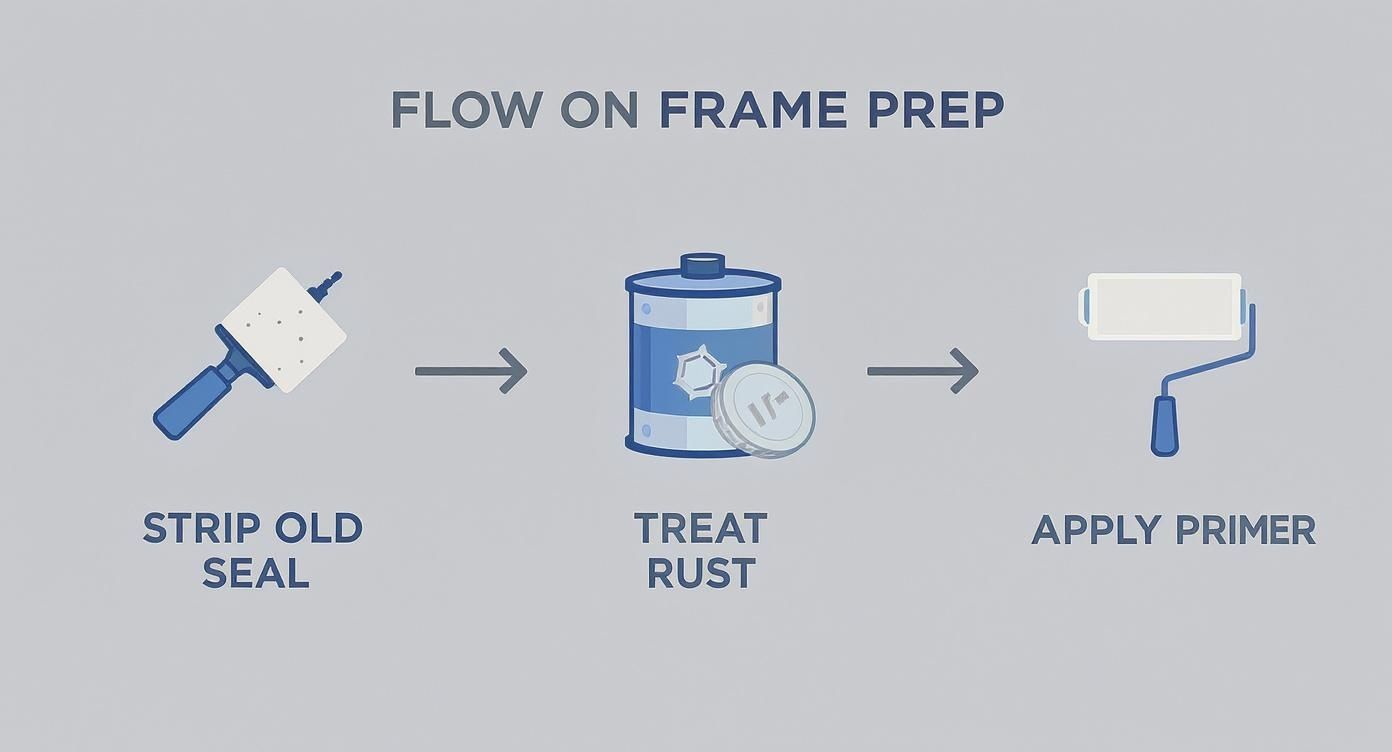
As you can see, properly stripping the old seal and dealing with any rust are non-negotiable. They create the clean, solid foundation the new adhesive needs to bond permanently.
Setting the New Glass in Place
I'm going to say this plainly: this is a two-person job. Don't even think about trying it alone. Rear windows are heavy, awkward, and expensive to replace if you drop one. Grab a helper and your heavy-duty suction cups.
Firmly attach one suction cup to each side of the new glass. Working together, lift the window and carefully carry it over the car. Slowly lower it into the frame, using the top and bottom edges as your guides to get the alignment right on the first try.
Once the glass is in position, press down firmly but gently around the entire edge. You're listening for a little squishing sound as the glass "sets" into the urethane, confirming you have solid contact all the way around.
The Final Touches and Curing Time
With the glass perfectly set, the final step is to make sure it stays that way. Use a few strips of painter's tape, running them from the glass up to the car's roof. This is just a simple way to keep the window from sliding down while the urethane cures.
Next, reconnect any of the electrical bits you disconnected earlier, like the defroster grid wires. Be careful here—those little connectors can be surprisingly fragile.
It's worth noting that automotive glass isn't as simple as it used to be. While tempered glass is still the standard for most rear windows, some vehicles now use laminated glass. Many also have integrated heating elements, antennas, and even cameras. If your car has an Advanced Driver Assistance System (ADAS), the job isn't done until the system is professionally recalibrated. This complexity is often why many people ultimately decide to leave this job to the pros. To learn more, you can check out some great resources on the evolution of automotive glass technology.
Common Questions About Rear Window Replacement
https://www.youtube.com/embed/r2QWMq1YPSI
Even with a detailed guide, a big job like swapping out a rear window always brings up a few questions. Let's walk through some of the most common ones I hear from people, so you can finish the project feeling confident you’ve got a solid, leak-proof seal.
One of the biggest hang-ups is the cure time for the urethane. Most adhesives will advertise a "safe drive-away time" of about 1 to 3 hours, but don't mistake that for being fully cured. For the urethane to form a complete, structural bond, you really need to give it up to 24 hours. A lot depends on the local temperature and humidity. During that first day, be gentle—avoid slamming doors and definitely steer clear of any high-pressure car washes.
What If I Mess Up?
It happens. Urethane is incredibly sticky and can get everywhere if you're not careful. If you do get a smear on your car’s paint, the key is to act fast.
While the urethane is still wet, you can usually wipe it right off with some isopropyl alcohol on a clean microfiber cloth. But once it cures? It’s a whole different ballgame. Trying to remove hardened urethane often leads to scratched paint. This is precisely why taking the time to thoroughly mask off your car’s body beforehand is a step you just can't skip.
So, can you tackle this job on your own?
Absolutely not. This is one of those times where you really need a second pair of hands. Rear windows are heavy, bulky, and surprisingly awkward to handle. Trying to lift one and set it perfectly onto that fresh bead of urethane by yourself is asking for trouble. You could easily smudge the seal, drop the glass, or even hurt yourself.
After the Installation
With your new window securely in place and fully cured, you’ll want to keep it clean to maintain that perfect visibility. If you're looking for some pro-level tips, there's some great advice on effective window cleaning techniques that work wonders for all your auto glass without causing any damage.
Finally, don't forget about the tech. Many modern vehicles have cameras and sensors mounted near the rear glass that are tied into your safety systems. After replacing the window, these systems often need to be recalibrated to function correctly. You can learn more about why this ADAS recalibration is crucial for ensuring everything from your backup camera to your lane-assist works as it should.
If you've gotten this far and decided that a DIY replacement feels like a bit too much, that's perfectly okay. Especially if your vehicle has complex ADAS features, sometimes calling in a professional is the smartest move. The team at Auto Renu Auto Glass LLC is here to help, offering mobile auto glass replacement and recalibration services throughout the Bay Area. You can get a free, no-obligation quote online today at https://www.autorenu911.com.