How to Fix Cracked Windshield: Easy DIY Repair Tips
Learn how to fix cracked windshield quickly. Our DIY guide covers essential tools, step-by-step repair methods, and when to seek professional help.
Sep 25, 2025
generated
how to fix cracked windshield, windshield repair kit, DIY car repair, auto glass, car maintenance

You know that awful smack sound when a rock hits your windshield? It's a noise that makes every driver's heart sink. While your first instinct might be to ignore a small chip, the real question is what to do next. A tiny nick is one thing, but a crack that starts to spiderweb across your vision is a whole different beast.
Before you rush out to buy a DIY repair kit, you need to take a deep breath and properly assess the situation. The choice between repairing and replacing your windshield isn't just about cost; it's about safety. It all boils down to three things: the type of damage, its size, and exactly where it is on the glass. Get this call right, and you’ll save money while keeping your car structurally sound.

What Kind of Damage Are We Talking About?
First, you need to identify the enemy. Different impacts leave different signatures on the glass, and some are far more forgiving than others.
Chip or Pit: This is the most common and least threatening issue—just a tiny piece of glass missing from the surface. Think of it as a small divot from a flying pebble. It's usually a straightforward fix.
Bullseye: Just like the name implies, this is a clean, circular break. These are also good candidates for repair, especially if you catch them early before dirt gets into the crack.
Star Break: This one looks like a small starburst, with little cracks radiating out from the center. These can be tricky. If those "legs" start to spread, a simple repair might not be enough.
Combination Break: A combo break is exactly what it sounds like—a mix of a bullseye and a star break. The complexity here makes it a tougher repair job.
Linear Crack: This is just a straight or slightly wavy line. These are the ones to watch out for, as they can grow surprisingly fast due to road vibrations and temperature shifts.
Knowing what you're up against gives you a much better feel for whether a simple resin injection will do the trick or if you're looking at a more serious problem.
How Big Is the Problem?
Size matters—a lot. Here's a quick and easy trick that pros use all the time: the dollar bill test. If a crack is shorter than a dollar bill (that's about 6 inches), you can often get away with a repair. For chips or bullseyes, if it's smaller than a quarter, it can almost always be filled.
Anything larger than that, and you're firmly in replacement territory. Attempting to fill a long crack with a DIY kit is a temporary fix at best. It won't restore the windshield's structural integrity, which is a major safety risk.
A good rule to live by: If the crack is longer than a dollar bill or the chip is bigger than a quarter, it's time to call in the professionals for a full replacement.
Location, Location, Location
Last but not least, where is the damage? This is a huge factor, and in some cases, it's non-negotiable.
If that chip or crack is sitting right in your line of sight as the driver, almost every reputable glass shop will insist on a replacement. Even the best resin repairs can leave a slight distortion, and that's the last thing you want distracting you on the road.
The edges of the windshield are another critical zone. A crack that reaches the edge is a major red flag because it can seriously weaken the entire pane of glass. Remember, your windshield provides up to 30% of your vehicle’s structural strength in a rollover accident. A compromised edge puts all of that at risk.
To help you make a quick decision, here's a handy reference guide.
DIY Repair vs Professional Replacement Decision Guide
Damage Characteristic | Recommended Action: DIY Repair | Recommended Action: Professional Replacement |
|---|---|---|
Type of Damage | Small, clean chips or bullseyes (under 1-inch diameter). | Long cracks, star breaks with spreading legs, combination breaks. |
Size of Damage | Crack is shorter than a dollar bill (6 inches); chip is smaller than a quarter. | Crack is longer than a dollar bill; chip is larger than a quarter. |
Location | Anywhere outside the driver's direct line of sight and away from the edge. | Directly in the driver's line of sight or a crack that reaches the edge of the glass. |
Number of Chips | One or two small, isolated chips. | Three or more chips, regardless of size. |
This table should give you a solid starting point. When in doubt, it never hurts to get a professional opinion.
The windshield repair market is projected to swell to around $5 billion by 2025, which shows just how common this headache is for drivers. This growth also means there are more options than ever. If you're dealing with a complex crack that's beyond a simple DIY fix, learning about your options for a professional windshield replacement is the safest next step.
Picking the Right Windshield Repair Kit and Tools
So you’ve decided to fix that crack yourself. Good on you—it’s a great way to save a decent chunk of change. But here’s the thing: your repair is only going to be as good as the tools you use. If you’ve ever walked into an auto parts store, you know how overwhelming it can be. There's a whole wall of kits, all promising to make your windshield look brand new.
Let's cut through the noise. The trick is knowing what you're actually buying and matching the tool to the specific type of damage you have. A simple chip is like a paper cut, but a small crack is more like a deep gash—they require different approaches to heal properly and become strong again.
Bridge vs. Injector Kits: What's the Difference?
When you boil it down, most DIY repair kits you'll find on the shelf fall into two camps. Knowing which one to grab can make all the difference between a nearly invisible fix and a permanent cloudy spot.
Injector-Style Applicators: These are the kits you’ll see everywhere, usually for under $20. They’re simple: a syringe-like plunger and a suction cup base that sticks to the glass. You just press down and force the resin into the crack. For a straightforward, small bullseye chip, these can work just fine.
Bridge-Style Applicators: These are the more serious cousins. A bridge-style tool has a stable frame—the "bridge"—that mounts over the damage, often with multiple suction cups for a rock-solid grip. The real magic here is that it lets you create a vacuum first, pulling all the air out of the crack before injecting the resin. This little step helps the resin get way deeper into the break, leading to a much stronger and clearer repair.
My take? If you've just got a tiny, simple chip, an injector kit will get you by. But for anything more complex, like a star break or a small crack, spend the extra few bucks on a bridge-style kit. The better result is absolutely worth it.
The Tools You'll Need Besides the Kit
The repair kit is the star of the show, but you'll need a good supporting cast to get a truly professional-looking result. Don't skip these—they're what separate a sloppy job from a clean, permanent fix.
Here’s what you should have on hand before you start:
Rubbing Alcohol (Isopropyl): This is non-negotiable. You need it to completely clean out the crack. Any oils from your fingers, road grime, or moisture will prevent the resin from bonding properly with the glass.
Microfiber Cloths: Grab at least two. Use one for a general wipe-down and a fresh one for the alcohol cleaning. Unlike paper towels, they won't leave tiny lint fibers behind to get trapped in your repair.
A New Razor Blade: Your kit will probably come with one, but I always keep a spare. You’ll need it to carefully scrape away loose glass slivers from the impact point and, later, to shave off the cured resin for a flush finish.
Safety Glasses and Gloves: Resin isn't something you want in your eyes or on your skin. It’s an irritant, so take the simple precaution.
Clear Packing Tape: If you notice a chip but can't get to the repair right away, stick a piece of clear tape over it. This is a fantastic little trick to keep dirt and rainwater out, which can make a simple repair impossible later on.
Expert Advice: Don't work in direct, hot sunlight. The resin will cure way too fast, before it has a chance to seep into all the tiny crevices of the crack. The sweet spot is working in the shade on a day that’s between 50-75°F.
Applying the Resin and Curing the Crack
Alright, now for the main event: the repair itself. This is where all that careful prep work pays off and you get to watch that ugly crack transform into a solid, almost invisible fix. I like to think of this as minor surgery for your windshield—precision and cleanliness are absolutely critical. We'll walk through getting the applicator set up, injecting the resin, and making sure it cures into a permanent bond.
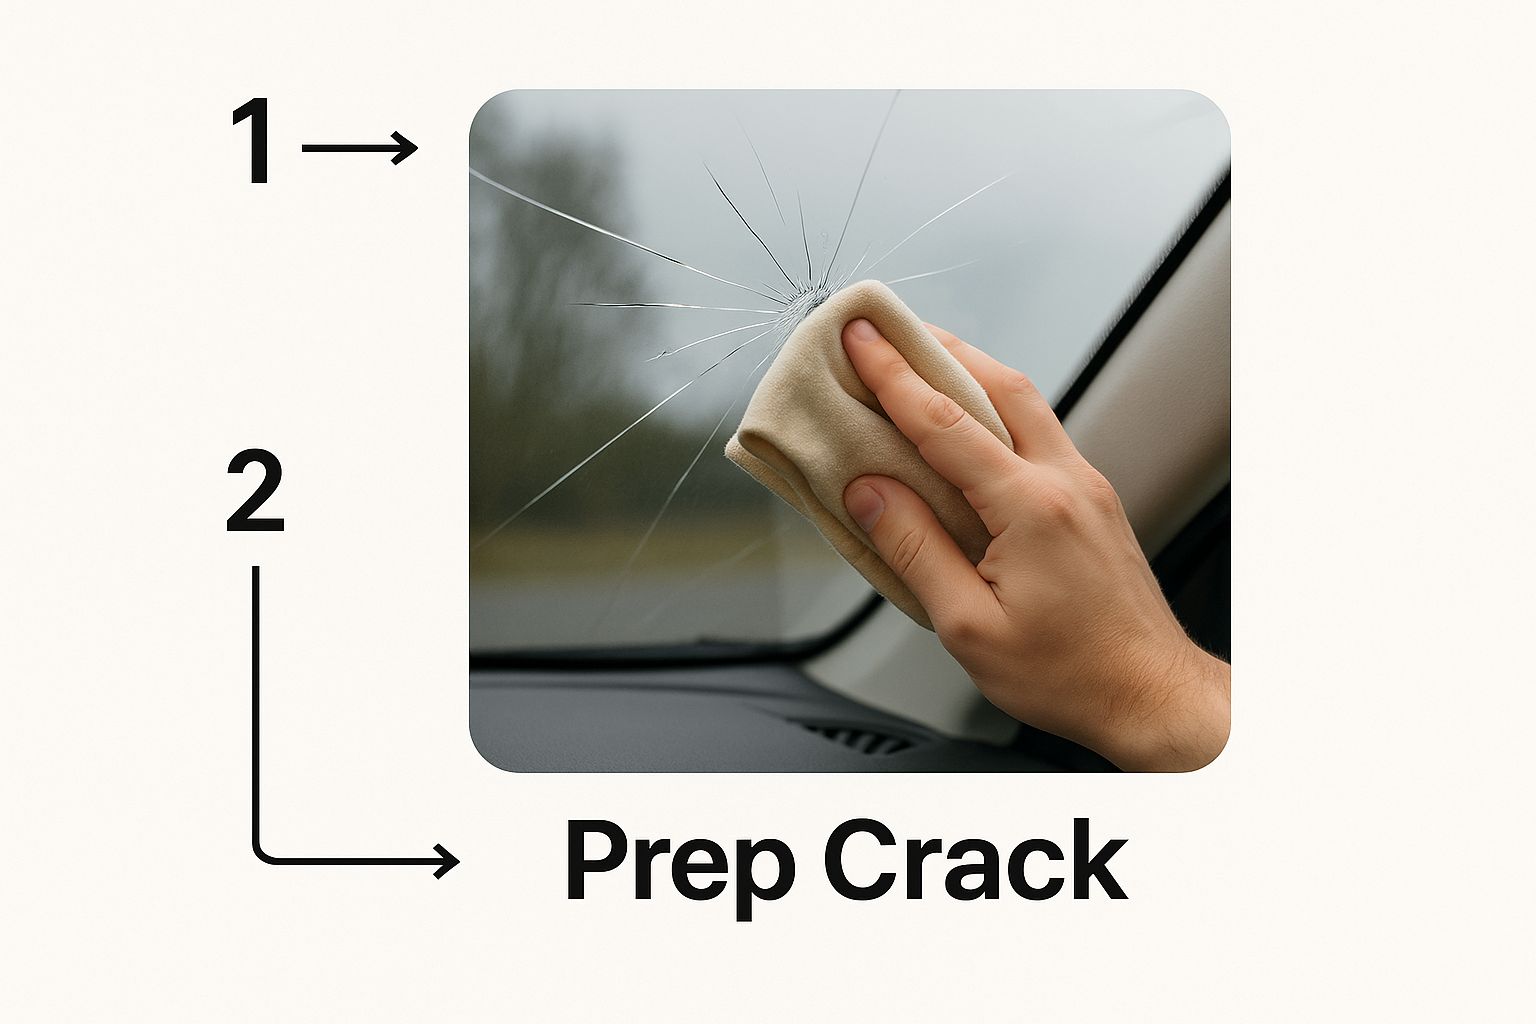
First things first, let's talk about cleaning the crack. Honestly, this might be the most important part of the whole job. If even a tiny speck of dust, oil from your fingers, or a bit of moisture gets left behind, the resin won't bond properly. You’ll end up with a weak repair that could fail later or just look cloudy and obvious. You need to create a perfectly pristine environment for the resin to do its thing.
Grab the pushpin or thumbtack from your kit and gently—I mean gently—pick out any loose bits of glass from the point of impact. You’re not trying to dig a new hole, just clearing the entryway. Once the debris is gone, douse a clean microfiber cloth with rubbing alcohol and give the entire damaged area a thorough wipe-down. This will get rid of any oils or road grime.
With a clean slate, it's time to get the applicator ready. This little tool is engineered to create a perfect seal around the damage, letting you pull a vacuum and then inject the resin under pressure.
Setting Up the Applicator Tool
Getting the applicator positioned just right is crucial for a good result. Most of the better kits, especially the bridge-style ones, use suction cups to create a solid base on the windshield. The goal is simple: center the tip of the applicator's pedestal directly over the impact point.
Here's how to nail it:
Position the Bridge: Set the applicator on the windshield so you can see the center of the chip or crack right through the middle of the pedestal ring.
Secure the Suction Cups: Press down hard on the suction cups to lock the bridge into place. Give it a little wiggle; it should feel totally solid.
Lower the Pedestal: Screw the resin chamber down until its rubber tip makes firm, even contact with the glass. You're creating an airtight seal around the crack. Don’t go crazy and overtighten it—too much pressure can actually make the crack worse. You're just looking for a snug fit.
As you can see, a perfectly prepped and cleaned area is the foundation for a repair that will actually last.
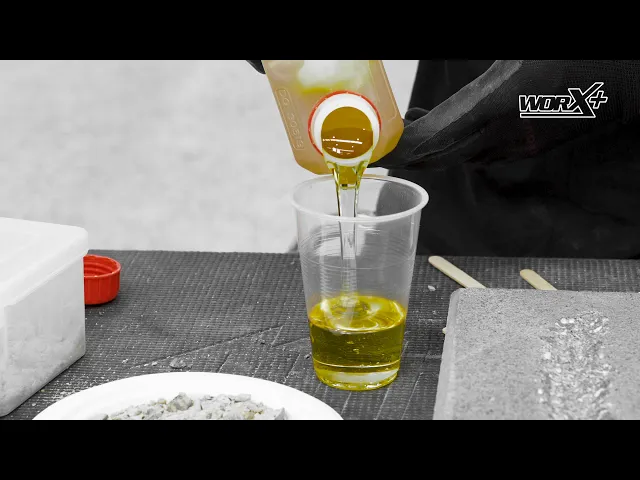
Injecting the Resin Properly
With the applicator sealed and ready, it's showtime. Most kits only need a few drops of resin, usually somewhere between three and six. Double-check your kit’s instructions, because adding too much will just create a mess you have to clean up later.
Once the resin is in the chamber, you'll screw in the injector. This is where the bridge-style kits really prove their worth. You'll start by drawing the plunger upward to create a vacuum, which literally sucks all the air out of the crack. It's pretty cool—you might even see tiny air bubbles rising up into the resin chamber. This step is essential because it clears the way for the resin to flow into every tiny fissure.
Pro Tip from the Trenches: After you've pulled the vacuum, try gently tapping on the glass from inside the car, right behind the repair area. The vibrations can help dislodge stubborn air bubbles that are hiding deep in the crack, giving you a much more complete fill.
Let the vacuum do its work for a minute or two. Then, you’ll remove the plunger to let the air back in before re-inserting it to apply pressure. This pressure phase is what forces the resin deep into the void you just created. As you apply pressure, you should actually see the crack start to vanish as the clear resin fills it in.
Leave the applicator in place under pressure for several minutes (again, your kit's instructions will give you the exact time). One of the best ways to track your progress is to have someone hop inside the car and look at the crack from that angle. Any unfilled spots or lingering air pockets will be much more obvious from the inside looking out.
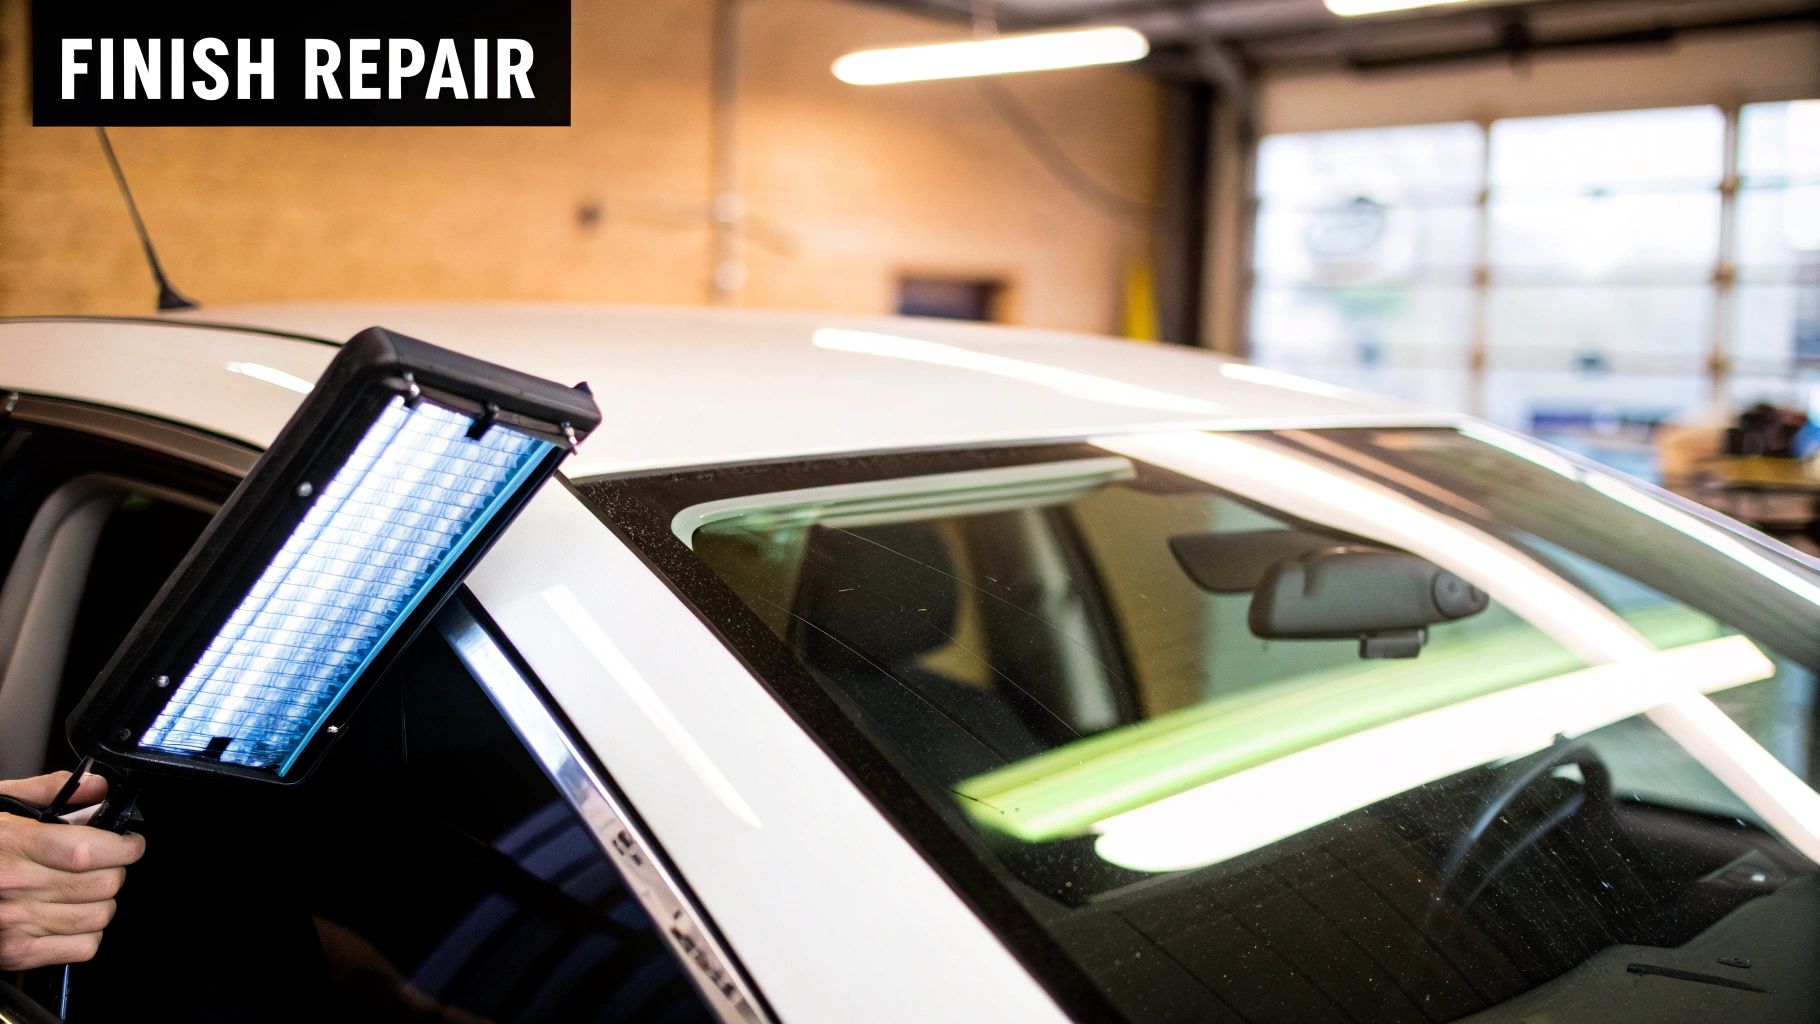
Curing the Resin for a Permanent Bond
Once you're confident the resin has completely filled the damage, it's time to lock it in. This last step uses ultraviolet (UV) light to harden the liquid resin into a tough, durable solid that essentially becomes one with the windshield.
Carefully remove the entire applicator assembly. Be gentle; you don't want to disturb the fresh, wet resin. Immediately grab one of the clear curing strips from your kit and place it flat over the repaired spot. This little plastic square does two things: it holds the resin in place while it cures and helps smooth it out for a perfectly flush finish.
Press down lightly on the strip to squeeze out any tiny air bubbles that may have formed on the surface. Now, you just need some sunlight. Move your car into direct sun and let the UV rays work their magic. On a bright, sunny day, this only takes about 15-20 minutes. If it's overcast, you'll want to give it up to an hour to be safe.
After the resin has fully hardened, you can move on to the finishing touch. Take the razor blade that came with your kit, hold it at a 45-degree angle to the glass, and carefully shave off the excess cured resin. Scrape gently until the surface feels perfectly smooth and level with the rest of the windshield. One last wipe with a clean cloth, and you're done. You've just learned how to fix a cracked windshield all on your own.
When to Call in a Professional Auto Glass Technician
Knowing your limits is a huge part of any DIY project, especially when your car's safety is on the line. While fixing a minor chip yourself can be really satisfying (and save a few bucks), there are some clear red flags that mean it's time to put down the resin kit and call in a pro.
Ignoring these warning signs isn't just about looks—it can seriously compromise the structural integrity of your vehicle.
The most obvious signs have to do with the damage itself. A good rule of thumb is the dollar bill test: if a crack is longer than a dollar bill (about 6 inches), it’s too big for a DIY kit. The repair just won’t be strong enough to stop the crack from spreading under the vibrations and temperature changes of daily driving.
Likewise, any crack that starts at or touches the edge of the windshield is an immediate dealbreaker for a home repair. These edge cracks are bad news. They can seriously weaken the entire pane of glass, which is a critical safety component of your car. Your windshield provides a ton of structural support in a rollover, so a compromised edge is a massive safety hazard you don't want to mess with.
Complex Damage and Structural Concerns
Beyond just size and location, the type of damage really matters. DIY kits are made for simple, clean breaks. But some damage is just too complicated for a basic resin injection to properly fill and stabilize.
Here are a few situations where you absolutely need a professional:
Deep Pits or Impacts: If the damage feels deep and has penetrated both layers of the laminated safety glass, a simple resin fill won’t cut it. That's a structural failure that almost always requires a full replacement.
Spiderwebs and Multiple Cracks: If your windshield has several cracks branching out from one another, looking more like a spiderweb, a DIY approach is officially off the table. A technician needs to assess the glass's overall integrity.
Dirty or Old Cracks: If a crack has been there for a while and is filled with dirt, grime, or moisture, it's nearly impossible for a DIY kit to create a strong, clear bond. Professionals have specialized tools to properly clean out the damage first.
In these cases, attempting a DIY fix on how to fix a cracked windshield can easily become a waste of time and money. A botched repair can make a professional fix much harder, or even impossible, forcing a full replacement that might have been avoidable.
The Critical Role of ADAS Recalibration
Maybe the single most important reason to call a pro these days is the presence of an Advanced Driver-Assistance System (ADAS). These systems use cameras and sensors mounted directly onto the windshield to operate vital safety features.
I'm talking about features like:
Lane-Keep Assist
Automatic Emergency Braking
Adaptive Cruise Control
Collision Warning Systems
Anytime a windshield is replaced on a car with these features, the system must be recalibrated by a trained technician with specialized equipment. Even a millimeter's difference in a camera's angle can cause the system to misread the road, which could lead to a catastrophic failure right when you need it most. This is not something you can do in your garage.
The growth in the ADAS calibration market shows just how essential this technology is. In 2022, the U.S. market for ADAS calibration tied to auto glass was around $959 million. It's projected to explode to nearly $15 billion by 2028. This isn't just a niche feature anymore; it's becoming standard.
Trying to replace a windshield and skip the recalibration is a serious gamble with your safety. If your car has any of these modern driver-assist features, professional service isn't just a good idea—it's non-negotiable for a safe repair. To get a better handle on this, you can learn more about the specifics of ADAS windshield calibration and see why it’s so critical for your vehicle's safety systems.
Tips for Preventing Future Windshield Damage
Alright, you’ve learned the ropes of fixing a cracked windshield. But let’s be honest—the best fix is the one you never have to do. Preventing the damage in the first place saves you time, money, and a whole lot of frustration. It really just boils down to a few smart habits on the road and paying attention to your surroundings.
Most of the time, the culprits behind those sudden chips and cracks are trucks and other big commercial vehicles. Their tires are magnets for rocks and road debris, which they can launch backward at incredible speeds. This is where a little defensive driving can go a long way in protecting your glass.
Adjust How You Drive
The most powerful tool you have is the space between you and the car ahead. When you find yourself trailing a big rig or a truck hauling gravel, back off. I mean really back off. Give yourself a good four to five seconds of following distance. That extra room gives any flying debris a chance to hit the pavement before it hits your windshield.
It’s also about being proactive. Don’t just blindly follow a construction vehicle down the highway. If you have a safe opening, move over a lane. Think of it as creating a "no-fly zone" for rocks and junk.
The goal is simple: stay out of the direct line of fire. A little extra caution on the highway is the best defense against those frustrating rock chips that appear out of nowhere.
This preventative mindset is more important than ever. With all the new tech being built into windshields—sensors, cameras, heads-up displays—they are becoming incredibly complex. The global automotive windshield market is expected to jump from USD 20.4 billion in 2025 to a staggering USD 46.2 billion by 2034. You can read up on these industry trends, but the takeaway is clear: replacing a modern windshield is expensive, so protecting yours is just smart money.
Keep Up with Simple Maintenance
You’d be surprised how much simple upkeep can protect your windshield from scratches and stress cracks. Take your wiper blades, for example. If you neglect them, they can turn into your glass's worst enemy.
When wiper blades get old, the rubber hardens and cracks, sometimes exposing the metal arm underneath. Dragging that across your windshield is like scraping it with sandpaper, creating tiny scratches that weaken the glass over time. A weakened surface is far more likely to chip or crack when it takes an impact.
Give your wipers a quick check every six months. Here’s what to look for:
Cracked or Brittle Rubber: If the blade feels stiff or you see splits, it’s done.
Streaking or Skipping: Wipers that leave behind streaks aren't making clean contact anymore.
Visible Damage: Any tears or missing chunks mean it’s time for a new pair.
Another huge tip is to avoid drastic temperature shocks. Never, ever pour hot water on a frozen windshield—that’s just asking for a crack. The glass expands too quickly, turning a microscopic flaw into a massive split. Use your car’s defroster or a de-icing spray. The same logic applies in the summer: don’t blast ice-cold AC directly onto a sizzling hot windshield. Let things cool down a bit more gradually.
Your Top Windshield Repair Questions Answered
Even with the right tools in hand, it's smart to have a few questions before you start a repair. Your windshield is a critical safety feature, so feeling confident about the process is key. Let's dig into some of the most common things drivers ask when they're deciding between a DIY fix and calling in a pro.
Will My Insurance Pay for This?
This is usually the first question on everyone's mind, and for good reason. The simple answer is, it all comes down to your specific policy. If you carry only the state-minimum liability insurance, the cost of the repair will almost certainly fall on you.
Things look much better if you have comprehensive coverage. This is the part of your policy that handles non-accident damage—think hail, falling tree limbs, or a rock kicked up on the highway. Because a small chip repair is much cheaper than a full windshield replacement, most insurance companies are happy to cover it, often waiving your deductible entirely.
Pro Tip: Dig out your policy and look for "full glass coverage." It's a common and inexpensive add-on in many states that covers windshield repairs or replacements with a $0 deductible. Some policies even specify the use of original manufacturer (OEM) glass.
How Long Will a DIY Repair Really Hold Up?
When you do the job right, a DIY windshield repair can absolutely last for years—potentially for the entire remaining life of your windshield. The resin in today's repair kits is incredibly tough and designed to form a permanent bond, restoring the structural integrity of the glass and stopping a crack in its tracks.
But the durability of your handiwork really hinges on a few things:
Kit Quality: You get what you pay for. A better bridge-style injector that creates a strong vacuum will give you a much more solid and lasting repair than a cheap, simple syringe.
Prep Work: This is where most DIY repairs fail. If you didn't meticulously clean the chip and remove every last bit of air before the resin went in, you're looking at a weak bond that could fail.
The Damage Itself: A clean, simple bullseye chip is the ideal candidate for a DIY fix and will almost always have a better long-term outcome than a complex star break with multiple legs.
A great repair will last. A sloppy one might give out the first time you hit a big pothole or the temperature plummets overnight.
Will I Still See the Crack After It's Fixed?
The main point of a repair is structural, not cosmetic. However, a good repair will make the damage far less noticeable. You can expect the chip or crack to be 80-95% less visible than it was before.
What you're left with should be a small, faint blemish that doesn't catch your eye while driving. The final clarity often depends on how quickly the repair was done. A brand-new chip that's clean and free of debris will always yield a clearer result than one that has been collecting dirt and moisture for weeks. If you're aiming for a near-invisible fix, it's often best to explore professional windshield repair services.
At Auto Renu Auto Glass LLC, we know that a damaged windshield is an unwelcome interruption to your day. That's why our mobile repair and replacement services come directly to you. If that chip has turned into a crack that's too much for a DIY kit, or if your vehicle needs professional ADAS recalibration, we have you covered. Let us get you back on the road safely. Visit us at https://www.autorenu911.com to learn more.
Article created using Outrank